![]()
|
|
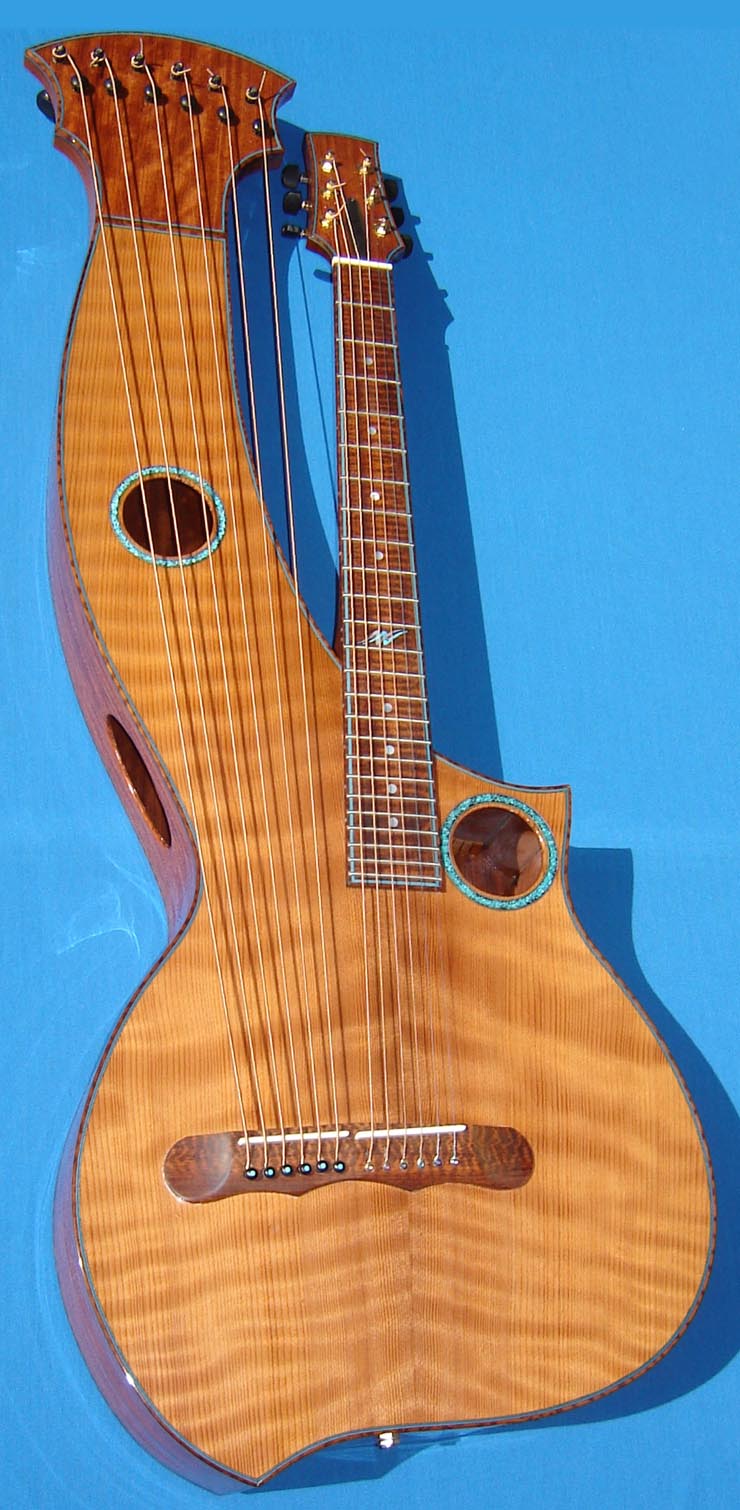
The Making of "Thor's Hammer" by Rich Mermer edited by Gregg Miner |
|
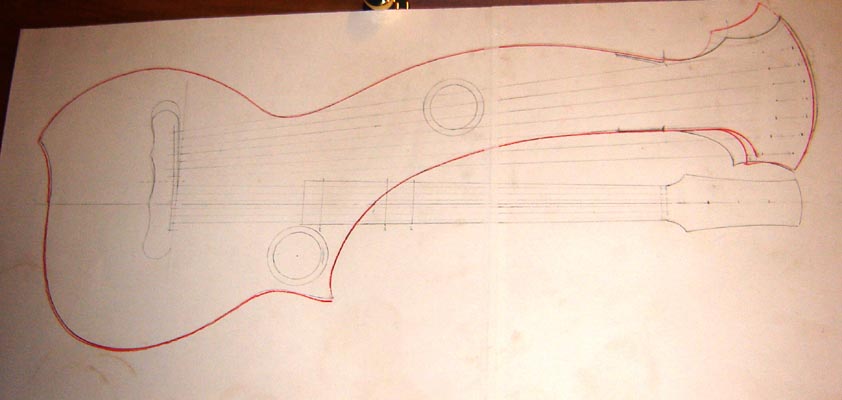
This instrument was inspired to some extent, by the double point harp guitars built by Chris Knutsen. I really like his basic aesthetic, but of course I had to tweak things a bit towards my own thinking. As with all my custom instruments, I started by doing a series of full scale drawings. Once I was feeling good about the basic layout (Fig.1), I started to look at different materials and how they would figure into both the overall sound and aesthetic of the instrument. |
|
|
As the harp guitar generally has a large internal air cavity, the bass
frequencies are naturally enhanced. It would be the trebles that I
would have to focus on developing, in order to produce a well balanced
tone. I chose bubinga for the back and sides as it is a relatively
dense hardwood and would help to enhance the higher frequencies of the
instrument. In deciding on a top material, I chose redwood, as it
offers the low end kick of a cedar, but also adds a sparkly high end
shimmer to the tone. I did happen to have some beautiful old growth
curly redwood that was set aside for such a project. I decided on using
snakewood for the fingerboard, bridge and bindings, as it added to the
exotic and earth tone aesthetic of the instrument. The turquoise chip
rosettes and turquoise-colored wood purfling were chosen as they added
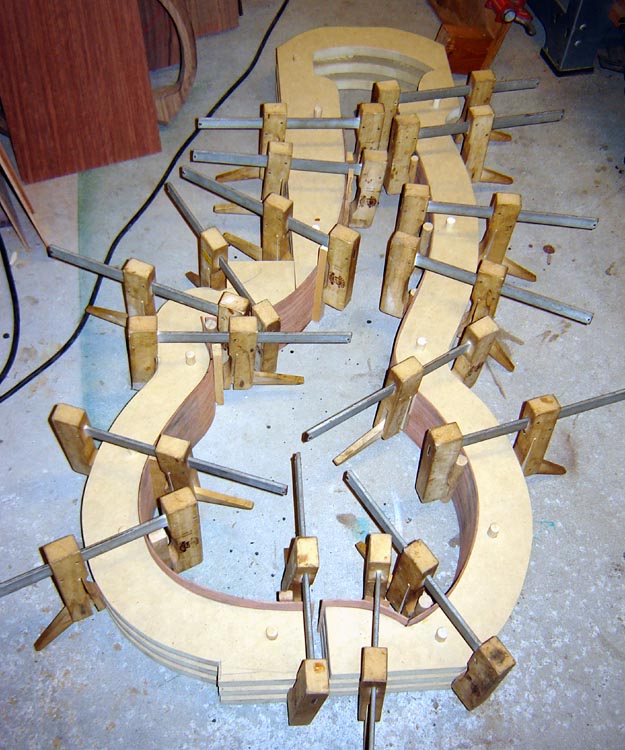
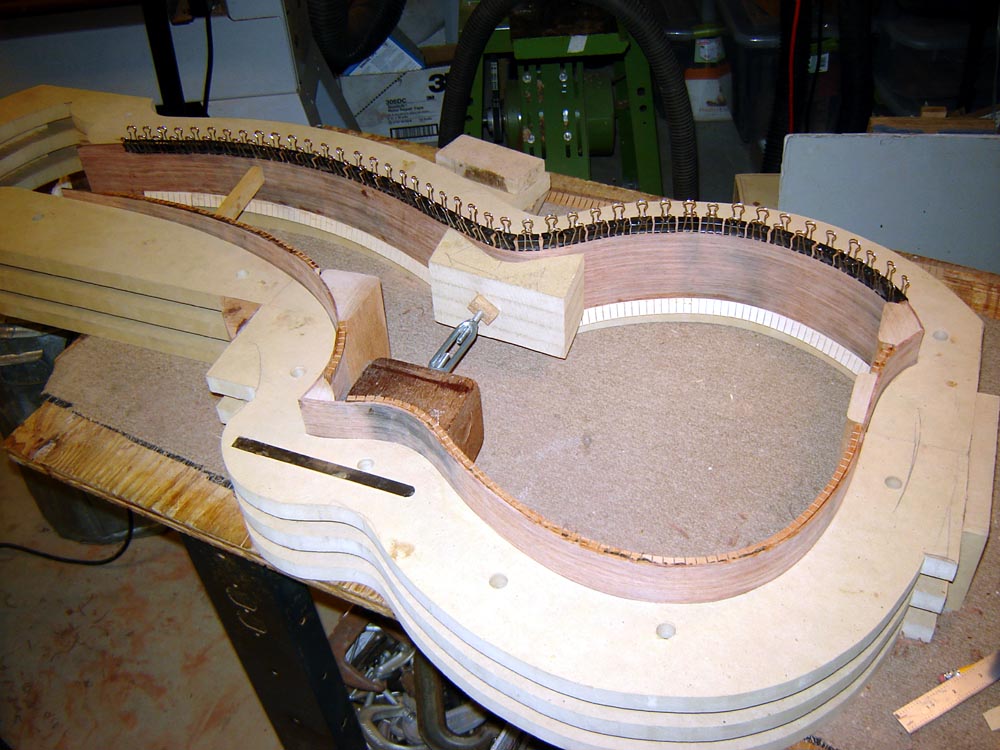
some contrast to the earthy look. First, I needed to make a new exterior mold out of MDF (medium density fiberboard), as this instrument was the first of its kind. Once the mold was completed, the material for the sides was trimmed to size, then thicknessed down to about .080 inches. I bent the sides the old fashioned way, by hand around an electric teardrop shaped bending iron. I allowed the sides to dry for several days in the mold as they were soaked in water prior to bending (Fig.2). Next the basswood and mahogany liner strips were glued in place, and then mahogany blocks were fashioned, fitted, and glued in at the neck joint, cutaway, butt end, and point on the bass side of the lower bout (Fig.3). Half-inch wide vertical strips of mahogany were fashioned and glued in place (spaced approximately 6 inches apart) to supply stiffness around the rim. At this point the opening for the trap door was cut out and braces were added around it, both to support the side and to allow for the actual attachment of the door using threaded brace inserts and tiny steel bolts. Once the rim was fashioned, it was secured into the mold and the edges contoured to fit the 25-foot radius of my tops and 15-foot radius of my backs. |
|
|
|
|
|
The bookmatched redwood top was glued up, thinned to about .120 inches, and trimmed. The rosette placement was marked on the exterior of the top and the inside and outside diameters of the rosettes were cut using a circle cutter mounted in a drill press. The soundholes were then cut using the same circle cutter, just adjusted to the outer diameters of the soundhole. I used a Dremel tool to carefully route out the channels for the rosettes themselves. Once the channels were routed and cleaned up, the rosettes themselves were fashioned using ebony dust, turquoise chips, and cyanoacrylic glue (crazy glue). Once dry, the top was put through the drum sander again and the rosettes were leveled with the rest of the top. |
|
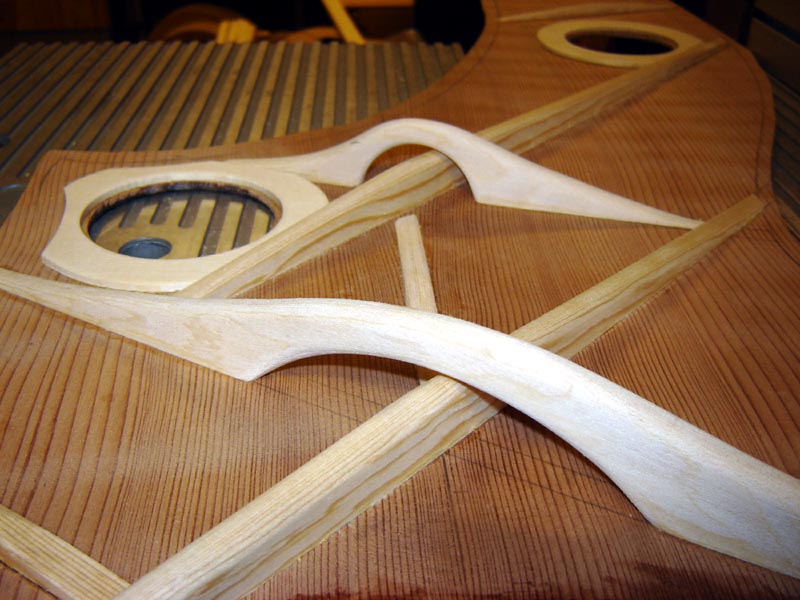
The brace locations were penciled on the interior of the top plate and the spruce braces were rough cut on the band saw. The bottom surfaces (gluing surface) of the braces were all contoured in a 25’ radius dish lined with 80 grit sand paper. I placed the redwood top on the radius dish, then glued and clamped the braces onto the top while on the radius dish. Once the rough braces were all glued to the top, the braces were trimmed and sanded to their finished shape (Fig.4). At this point I should note that I decided to utilize an arch in my ‘X’ braces. Most ‘X’ braces are lap jointed; they overlap each other and are glued together – i.e.: cut the top half of one piece, the bottom half of the other, and glue together. I had had a nice chat with Ken Parker a while back and he showed me the bracing that he was using inside one of his instruments. It featured one continuous brace, with another arching over where the junction or ‘X’ would be (Fig.5). |
|
|
|
|
|
|
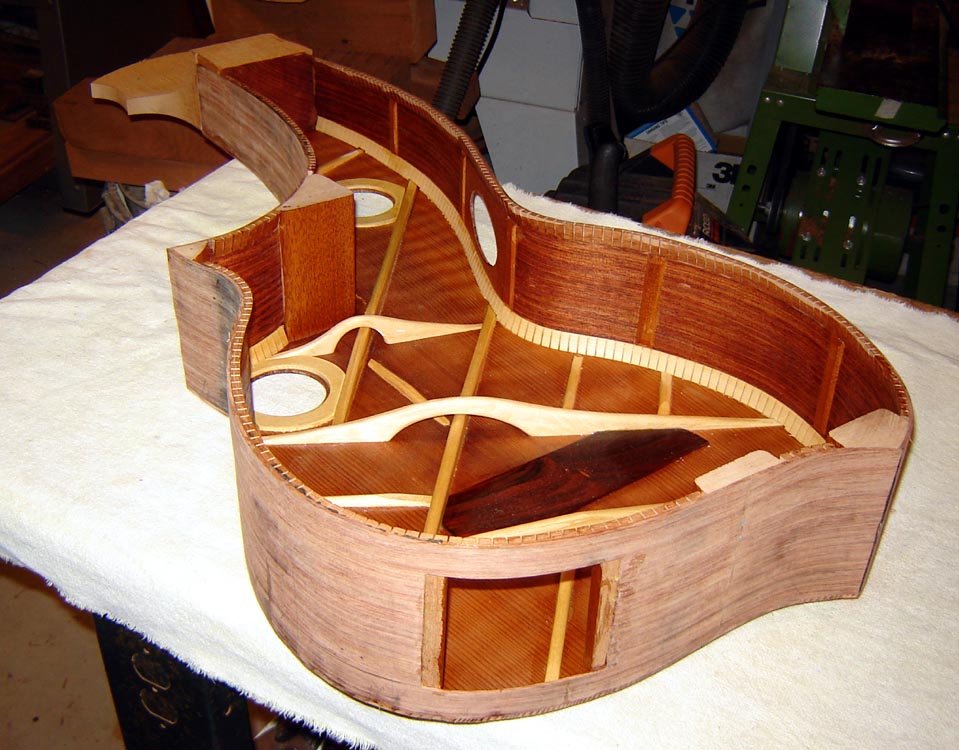
I decided to give this a try, as I had already been using flying buttress braces in other areas of the top (generally under the fingerboard). The idea is to add support where needed, but to also loosen the top up a bit to allow for greater dynamics. At this point the top was fitted and glued to the rim (Figs.6 & 7). |
|
|
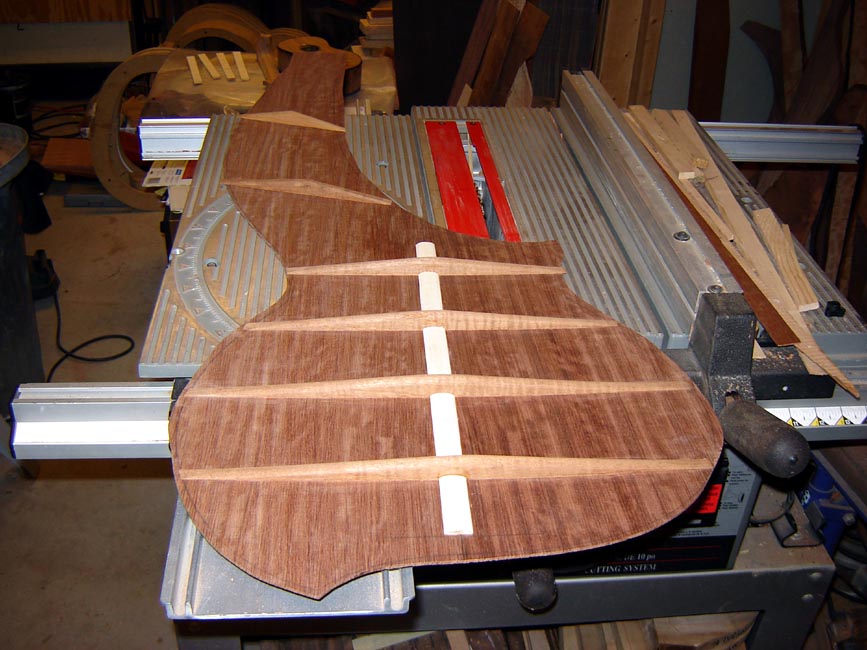
The bookmatched halves of the back were glued, thinned to about .10 inches and then trimmed. The mahogany braces were rough cut, and their gluing surfaces were radiused on a 15 foot radius dish. The braces were then glued onto the back, while on the radius dish. Once dry, they were planed and sanded to shape. I do shape my back braces a little differently than most others, tapering their height from their center (Fig.8). This supplies the required stiffness, but helps reduce the weight. Next it was time to fit the back and get it ready for attachment to the rim/top assembly. First however, I put a “wash coat” (1 pound cut) of shellac on the interior of the instrument. Moisture will gradually move through all finishes, even the exterior lacquer. This very thin coat of shellac on the instrument’s interior helps to slow down movement in the wood (expansion and contraction across the grain) as a result of changes in humidity. Next a label was glued onto the interior of the back and the top was signed and dated (labels can fall off). The back was then glued onto the contoured rim. |
|
|
|
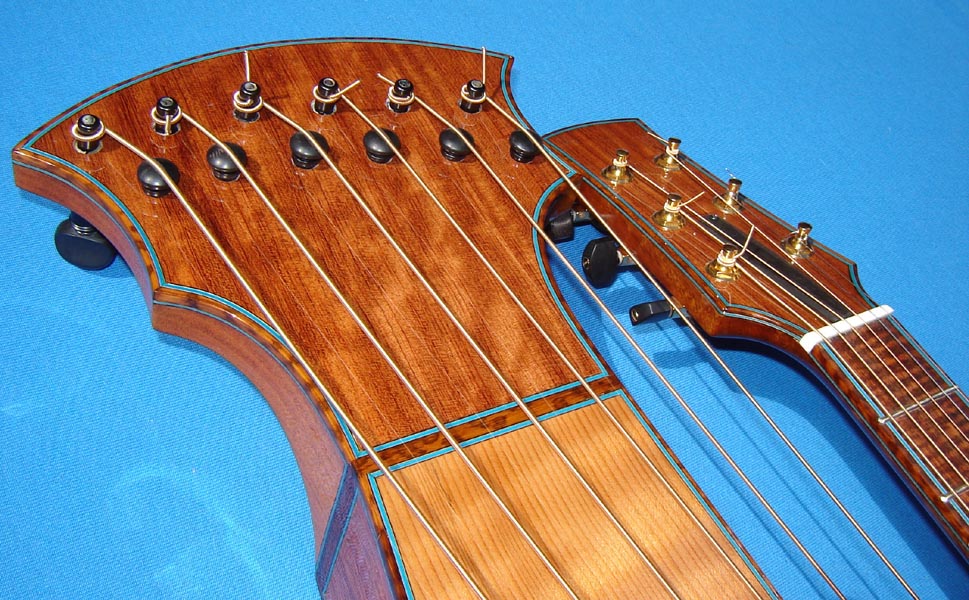
Next the body was rough sanded to100 grit. I used a laminate trimmer and routed the edges for both the purfling and binding. I then bent the binding and purfling strips, just as I bent the sides. After a day of drying out, they were glued into place. I use fiberglass strapping tape to hold the binding in place, as it is easier for me to control the tension at a very specific point than with the rubber bands that many luthiers use. Once the binding was dry, I cleaned up the dried glue mess with my favorite tool, a single edge razor blade. I then drilled the holes on the harp arm’s peghead for both the tuner shafts and the individual string nuts (I use violin endpins that are trimmed). Lastly, the body was sanded to 150 grit. Now that the body was done, on to the neck and fingerboard. The figured Honduran mahogany neck blank was rough cut on the band saw, and then the gluing surfaces for the peghead and fingerboard were cleaned up on the belt sander. Next the channel for the adjustable truss rod (2-way) was cut on the table saw. I then glued on the bubinga peghead veneer. Once dried, I finished off the peghead shape and neck taper on an oscillating spindle sander. I then did a rough profiling and shaping of the neck on the oscillating spindle sander, and finished her up with hand sanding down to 100 grit. Next I routed a channel for the purfling, which was glued and tapped in place. When dry, I broke out the trusty single edge razor blade again. At this time I worked on fitting the neck to the body. Extra care must be taken to correctly align both the neck with the bridge and its string placement, and to achieve the proper break angle for the strings over the bridge’s saddle. Once this was accomplished I turned to the working of the fingerboard. I first thicknessed the fingerboard to .25 inches, then the fret slots were cut by hand with a back saw. Next the board was tapered to the proper width, minus the thickness of the binding that I planned to use. I routed a channel for the purfling, which was glued and tapped in place. Once dried, I sawed through the purfling to extend the fret slots. The binding was then glued and taped in place. The inlay locations were marked and the fingerboard was prepared to accept the inlays. A ¼-inch bit in a drill press was used for the pearl dots, while I used a Dremel tool and fine bit to cut the cavity for my pearl and turquoise ‘M’ at the 12th fret. The inlays were glued into place and once dry, were sanded flush with the fingerboard surface. I then drilled the holes on the side of the fingerboard, to accept the small pearl dots that I used for the side position markers. The fingerboard was glued to the neck and, once dry, a final sanding of the neck down to 220 grit was done. Finally, I used my stationary belt sander to put a 20 inch radius to the fingerboard. Once this task was completed, I was ready for finish work. |
|
|
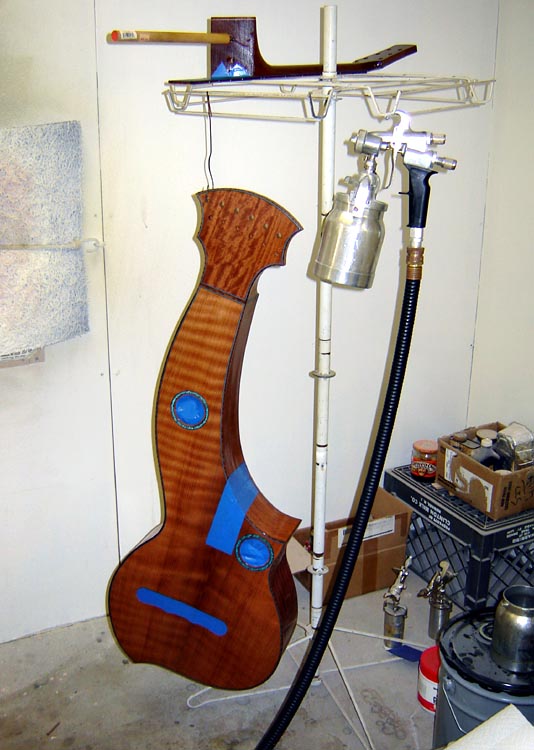
I use McFadden’s nitro-cellulose high gloss lacquer on all my instruments at this time. I will be more than happy to switch over to one of the newer, more environmental friendly finishes once they have conquered the problem of finish “re-melting.” What is nice about “nitro” is that the most recently applied coat will melt all previously applied lacquer coats, to produce one nice coat. This is not so with most other materials, and as a result it is very possible, and even probable, that you will sand through one finish layer into another. If this happens, what are called “witness lines” appear between the two layers of unblended finish. Not a pretty sight. Here is my finishing schedule: |
|
|
|
|
|
|
| After the finish was buffed out, I first glued the bridge into place. After the bridge was glued to the body, the neck was attached. Once completed, the neck’s nut and the bridge saddles were made and fitted, the pickups and output jack were installed, tuners were installed, frets leveled and crowned, the instrument was strung up and the action was set up. |
 |
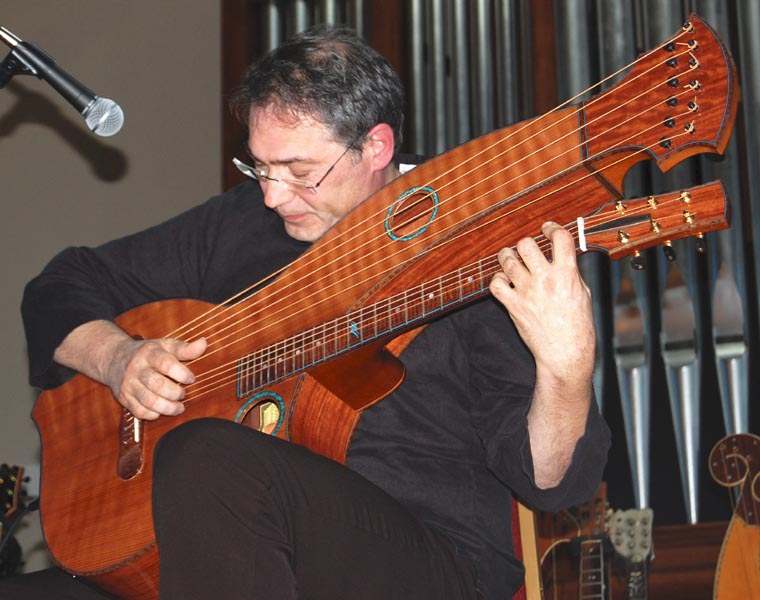
Generally most folks would think that one is done at this point, but most instruments will move a bit as they break in over the first few days of being strung up, so there are inevitably issues that arise and they have to be dealt with: truss rod adjustments, action adjustments, frets need tweaking, etc. I would love to have an instrument hang around the shop for at least a week before shipping. Unfortunately that is not always the case as clients always want them immediately (or yesterday), or I’m working to get things done and the time is down to the wire. For example, I was working on this harp guitar for 53 hours (no sleep) prior to leaving for the airport (yes, my wife drove) and flying with it to Portland for Harp Guitar Gathering 6. I’d like to thank all the kind folks for their gracious comments and for their forgiveness of the instrument’s last minuet setup (actually strung up in Portland for the first time!). My bad, but that is life. |
|
|
Special thanks go out to Don Alder for graciously playing and showcasing the instrument during the course of the event (I owe you a big one Don) and I’d also like to thank my friend Benoit Meulle-Stef (Ben) for nicknaming the instrument Thor’s Hammer; it’s growing on me. Best to all! - Rich Mermer |
|
|
|
About the Author Rich
Mermer, Jr. has been designing, building, and repairing fretted
string instruments since 1983, after completing his studies at the
Roberto-Venn School of Luthiery in Phoenix, Arizona.
Rich’s instruments have been featured in the books, Custom Guitars: A Complete Guide to Contemporary Handcrafted Guitars (String Letter Publishing, 2000); and Lap Steel Guitar (Centerstream Publishing, 2003). They have also been featured in the articles, Guitar 2000: Today's State of the Art, Tomorrow's Innovations (Acoustic Guitar Magazine, August 1998, Issue 68); and in The Holey Grail: Why Leading Guitar Makers Are Rethinking Traditional Soundhole Design (Acoustic Guitar Magazine, February 1999, Issue 74). Rich has been a member of both the Guild of American Luthiers (G.A.L.), and the Association of Stringed Instrument Artisans (A.S.I.A.) since 1983. He has been published in Guitarmaker, the official publication of Association of Stringed Instrument Artisans; and in American Lutherie, the quarterly journal of the Guild of American Luthiers. |
| If you enjoyed this page, or found it useful for research, please consider supporting Harpguitars.net so that this information will be available for others like you and to future generations. Thanks! |
|
|
|
All Site Contents Copyright © Gregg Miner, 2004,2005,2006,2007,2008. All Rights Reserved. Copyright and Fair Use of material and use of images: See Copyright and Fair Use policy. |


 Rich's
shop is not geared towards mass production techniques, although jigs and
tooling are certainly used to cut down on the time spent on the more
tedious and repetitious steps in the construction process. Rich prefers
to build from one to three instruments at a time, and usually completes
from 10 - 12 instruments each year. These instruments are handcrafted
works of art that are built to the specifications of the client. Many
artists are using Rich’s instruments in the studio and in live
performance.
Rich's
shop is not geared towards mass production techniques, although jigs and
tooling are certainly used to cut down on the time spent on the more
tedious and repetitious steps in the construction process. Rich prefers
to build from one to three instruments at a time, and usually completes
from 10 - 12 instruments each year. These instruments are handcrafted
works of art that are built to the specifications of the client. Many
artists are using Rich’s instruments in the studio and in live
performance.