![]()
|
Volume 2, Issue 3, February, 2005
|
|
|
ROLLING
THROUGH by Stacy Hobbs |
||
|
In today's workshop we’re going to apply arpeggios to some common
chord changes. For the
musically illiterate, take out your pocket Harvard Music dictionary and
look up arpeggio! Let's establish a key. To
begin, we will be in the key of C. Our
chord progression will be C down to Am. Let me walk you through the progression first. Play a C chord with your left hand. This chord is commonly known as G/B or G with a B in the bass.
Sometimes I refer to it as a passing chord. Next we play an Am chord to end the progression.
Let's play through the progression using our sub bass notes. Hold down a C chord with your left hand.
Play the 9th sub bass string with your right hand thumb,
and then play the 3rd, 2nd, 1st, 2nd,
then 3rd string
one after the other. You have
just played an arpeggio, which, in this case, uses six individual notes of
your chord starting with your sub bass note.
Repeat this pattern until you can play it clean, comfortable, and with an evenness of tone from bass to treble. |
Now play your G/B chord. Play
the 10th sub bass string with your thumb following through as
before with your right hand playing the same pattern on the same strings. Lastly, play an Am chord. Play the 11th sub bass string with your thumb and repeat the above pattern. Reversing the order of the chord progression will create a nice
“loop” to experiment with. You have just played a very common chord progression and with a
little experimenting you should be able to apply this technique to songs
you already know. When we play arpeggios, it may be helpful to keep in mind that if
you’re in 3/4 time you’ll play six individual notes.
When you're in 4/4 time you’ll play eight individual notes.
This is a general rule and made to be bent, broken, or disregarded
altogether!! You can extend the progression we just played by adding an Am/G
after the Am chord. You would simply continue to play the 12th
sub bass note followed by the arpeggio on the Am chord. |
This
is basically the chord progression to
“When A Man Loves A Woman” by Percy Sledge.
For the more advanced beginner, you may want to tackle the
progression (or a variation) in the key of D.
Do this by first retuning your C sub bass note up to a C#. You can now play the Mr. Bojangles chord progression in much
the same arpeggiated fashion as before. To start, play a D chord, followed by a D/C#, down to a Bm, then a
Bm/A, to G, then an A and resolve on D.
You get the idea! If you’re having trouble interpreting the “slash” chords
(G/B), here’s the deal. The
first note is the primary chord you will be holding down and the note
after the / is the bass note which is to be substituted for the primary
bass note of the chord! Roll on, Stacy |
|
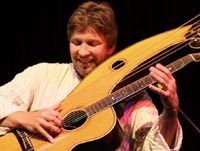
Stacy Hobbs has been performing, recording, and teaching music for the past 22 years. He purchased his first Harp Guitar in 1998, which proved to be his true calling. Visit www.stacyhobbs.net for more! |
||
|
All Site Contents Copyright © Gregg Miner, 2004,2005,2006. All Rights Reserved. Copyright and Fair Use of material and use of images: See Copyright and Fair Use policy. |
|
All Site Contents Copyright © Gregg Miner, 2004,2005. All Rights Reserved. Copyright issues and use/ownership of images: All information provided on this site is copyrighted by Gregg Miner, with the exception of Forum messages which are public domain. All images used within this site are copyrighted by Gregg Miner, unless copyrighted by the original image owner. Images within the Knutsen Archives are accompanied by full owner credits. Images on the remainder of the site include, at the end of their file name, the name of the person, author, or source from where the image was obtained. These sources may or may not be the copyright owners of the image, and are accurate only so far as I have been able to determine. Permission to use any images from this site must be granted by either the original owners or myself. Those images taken from books, web sites or other published sources without express permission are reproduced here for research purposes only, and are displayed at low (72dpi) resolution only. If anyone believes an image belonging to him or her is mis-credited, or violates his or her use policy, please contact me for correction or removal. |
|
If you enjoyed this article, or found it
useful for research, please consider making a donation to The
Harp Guitar Foundation,
|
|
|
|
All Site Contents Copyright © Gregg Miner,2004-2020. All Rights Reserved. Copyright and Fair Use of material and use of images: See Copyright and Fair Use policy. |