|
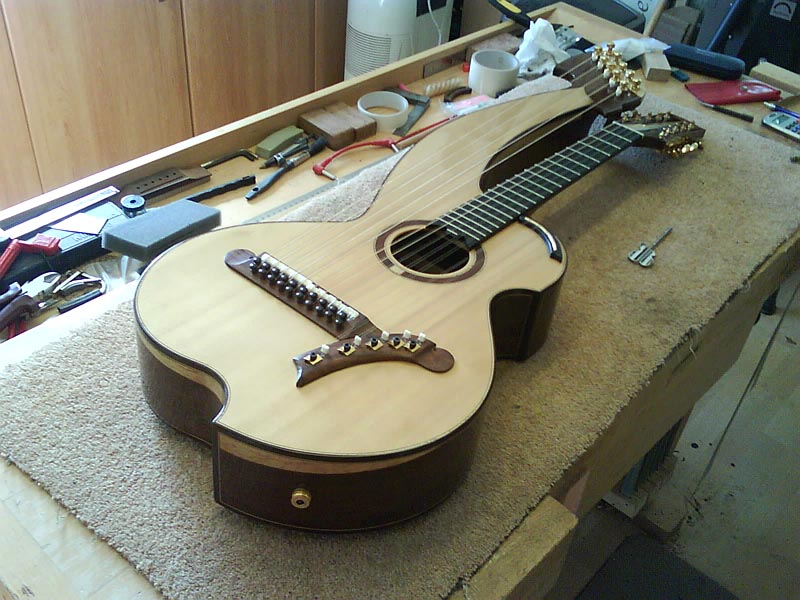
In a dimly lit hotel room after a full day of festivities at the third annual Harp Guitar Gathering in Salem, Oregon, luthier Stephen Sedgwick closely studied the viola caipira that I had brought for his inspection. For the uninitiated, his behavior while examining the instrument would have seemed peculiar. After he took the instrument from my hands, he raised it close to his face. As his gaze passed above the sound hole, he scrutinized the fingerboard with a keen eye. The luthier that had made my viola caipira was an amateur at best. With Steve’s face taut in a scowl of concentration, I would occasionally notice an almost imperceptible nod as he paused to tap certain areas of the back and soundboard. I could tell that he was assimilating information that would prove invaluable going forward. Then, as he concluded his appraisal of the viola caipira, he abruptly handed it back to me. “Good,” he said, “Now it’s time to start making this thing…” Phase IV – Materials
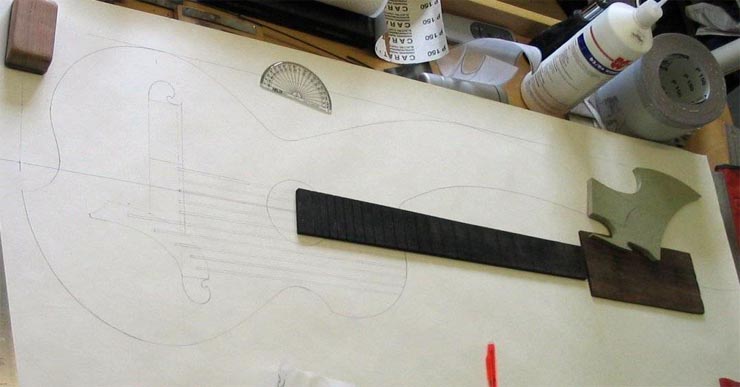
Final
Arpa Viola Caipira design before construction with ebony fretboard,
headstock veneer and bass head stock template. After a year of planning and with
designs complete, Steve was finally ready to build the instrument.
Still, before he could begin, we had to make the final decisions on what
wood and tuners to use. Here’s a list of what we decided on: Woods
Tuners
I knew that for the viola caipira, Brazilian rosewood was traditionally
used for the back and sides. Considering this fact, it would make sense to
use this wood for the arpa viola caipira (which I will subsequently
refer to by the acronym AVC). Unfortunately, Brazilian Rosewood is very
difficult to find and expensive. Steve also pointed out that even if I
could find someone selling old "pre ban" Brazilian rosewood, it
would still be incredibly hard to find in the length needed for the back
and sides of a harp guitar. Nevertheless, at that point, I was happy with
using the Brazilian mahogany Steve had in stock. His previous instruments
with Brazilian Mahogany were very impressive. Still, I kept my eyes open
just in case. And then, only one month before Steve was to cut out the sides, I found
a Brazilian rosewood supplier located in Brazil that specialized in
"pre-ban" Brazilian rosewood. After I gave him the AVC
dimensions, I actually felt relieved when I was told that they did not
have any harp guitar sized wood it stock. Buying expensive woods was not
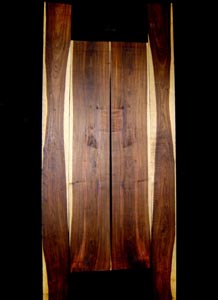
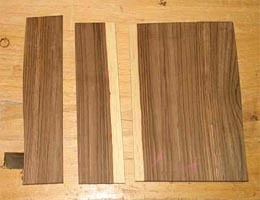
something I was planning on. Three weeks later, I got this picture:
Brazilian
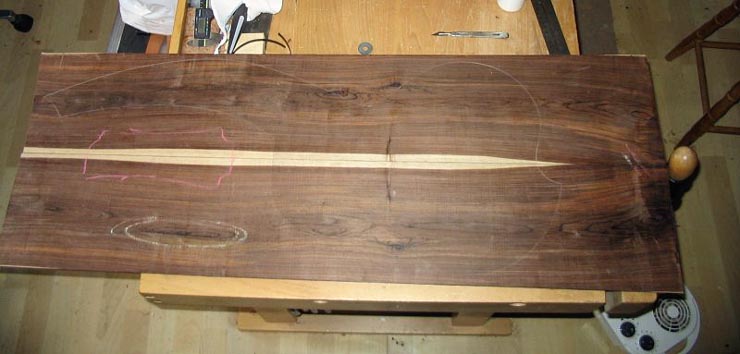
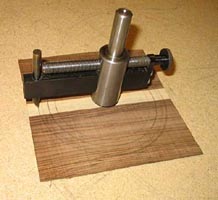
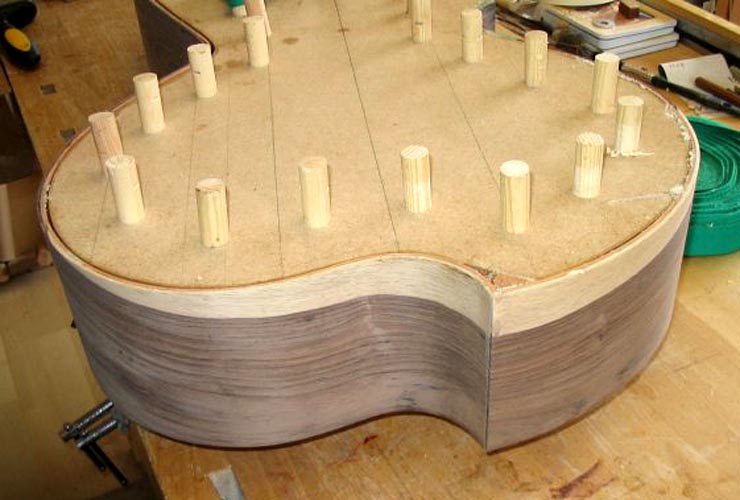
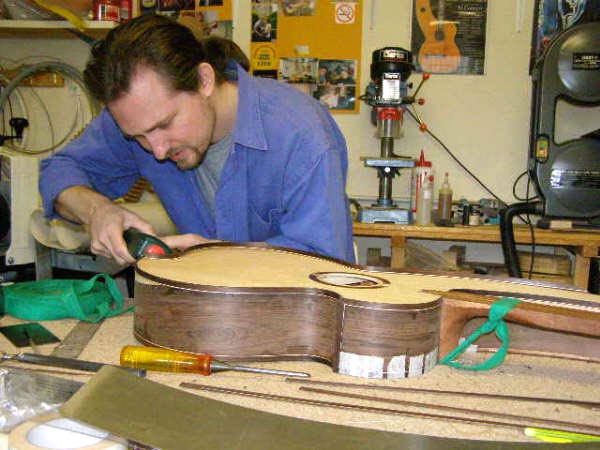
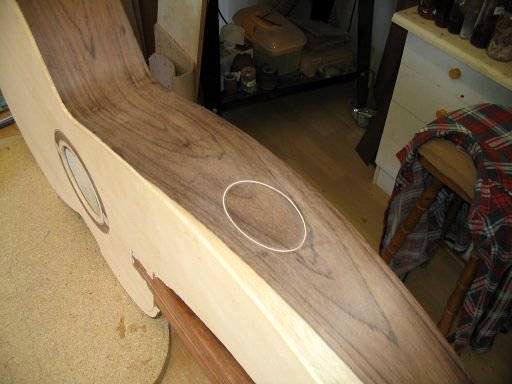
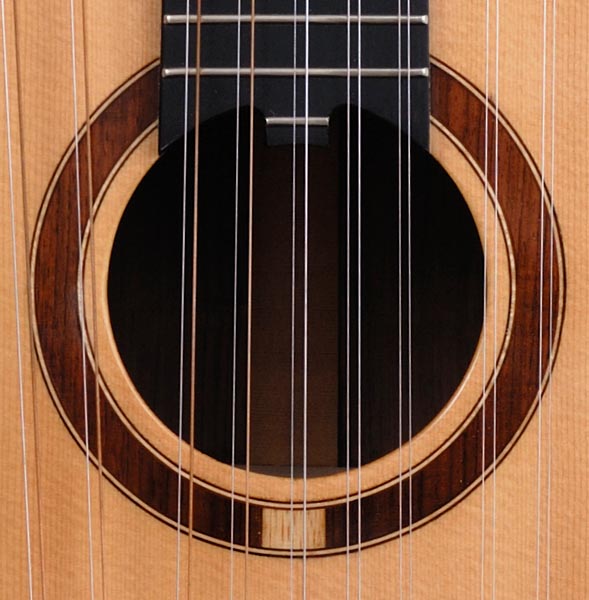
Rosewood, cut to AVC dimensions. Astonished, I found myself faced with the highly unlikely choice between Brazilian mahogany or Brazilian rosewood for the back and sides. When I inquired into the wood's origins, I was told that it was "recycled from an 80 year old bridge column from the city of Caravelas which is located in the southern Bahia State of Brazil" After thinking it over, I decided to go ahead and get the Brazilian rosewood. There's only one time in the life of an instrument when you make this decision and I didn't want to wonder years later if I should have taken advantage of this improbable opportunity. Now it was time for me to step back and watch Steve build the AVC. Phase V – Construction The Sapwood Effect: Back, Headstock Veneers and Rosette Over the next few months, Steve started building the AVC. When it was time to form the back and sides, Steve sent me a few pictures of the Brazilian rosewood planks he was going to use for the back with a clear perspex body-shaped template on top. He did this to help us visualize how the wood would look once it was cut. In one picture, he arranged the back wood in a way that had a sap wood stripe running down the middle. I really favored this look and so we decided to go with it.
Picture of back wood with template showing back
headstock tracing. When looking at these pictures, we both noticed that there would be some leftover wood. With this in mind, I began to think of what it could be used for. One thought that came to mind was to use some of the left over wood for a veneer on the back of the guitar headstock. Since it would be from the same piece, the veneer would also have a sapwood stripe which would match the back. Steve also thought this was a good idea and when he made the veneer, it matched perfectly! With this sapwood stripe motif in mind, he was also able to expertly create a veneer for the front of the guitar headstock, the truss rod cover and the rosette. In the end, the sapwood stripe would be seen on the front and back of the instrument. Making the sapwood stripe properly on the front veneer proved to be an intricate endeavor. He ended up needing to add a third piece of sap wood between the two pieces he used to make the veneer so that the sap wood stripe would be wide enough.
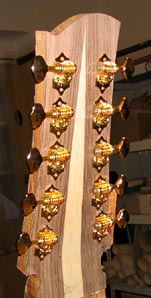
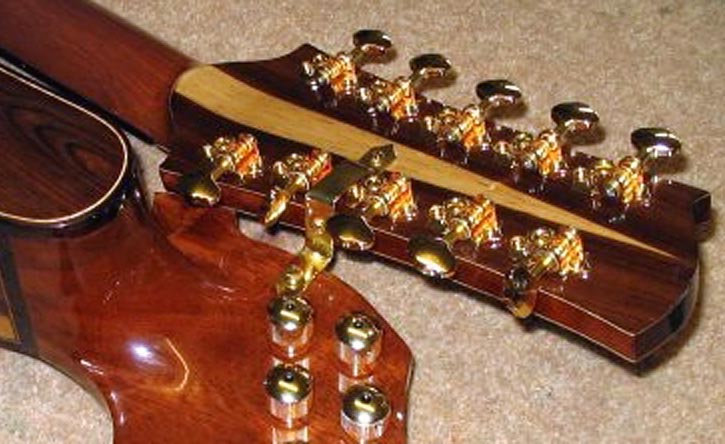
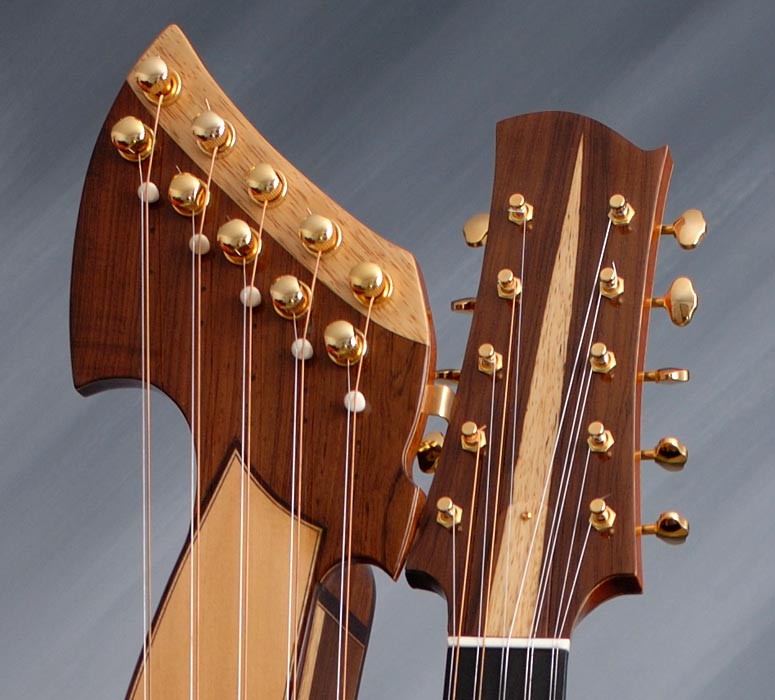
Front and back headstock veneers with the open
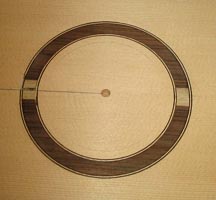
Gotoh 710 tuners When making the rosette, Steve needed to use three pieces of Brazilian rosewood. I was very happy with the rosette he made. The width of the sapwood in the final rosette nicely matched the width if the fretboard extension.
The wood used for the sides of the instrument also had a significant amount of sapwood in it. When Steve cut down the sides and bent them, he was able to have the edge of the sapwood meet at the bottom cutaway in an attractive way.
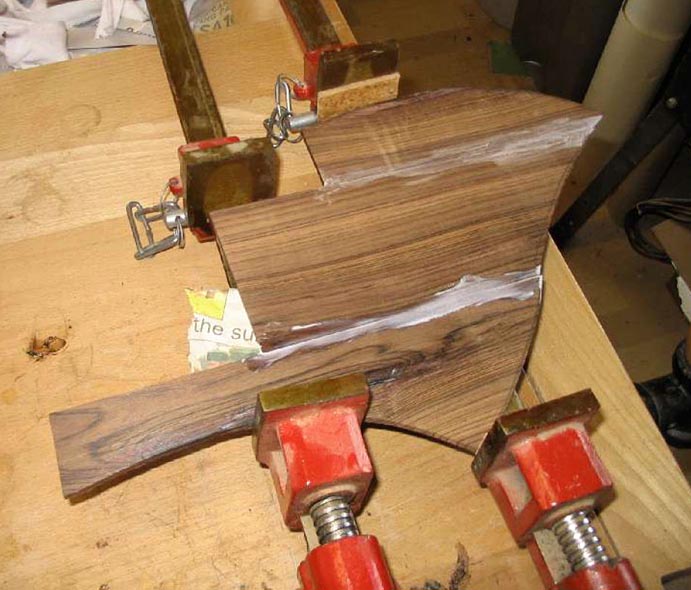
There was also a question of what to do for the bass headstock veneer. I liked how the burled mahogany looked on some of Steve’s other harp guitars but we both agreed that, if possible, the veneers for the headstocks should be consistent with the veneers on the rest of the instrument. Steve was able to piece together enough Brazilian rosewood for the entire bass headstock veneer. In the end, he needed four pieces to do it.
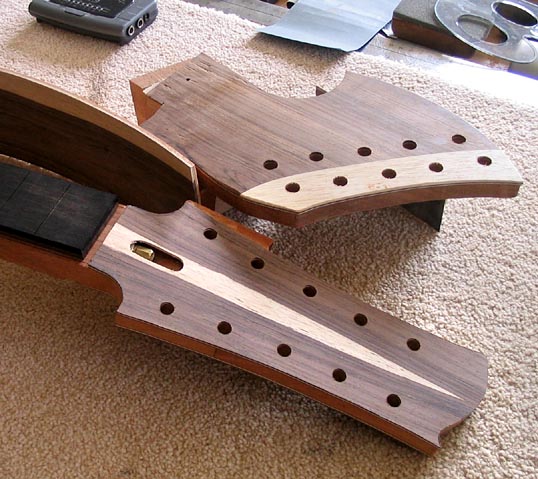
Piecing together the bass headstock veneer A worry that we both had was that if the entire surface of the bass headstock was covered with a veneer, it would resemble one big table attachment! To avoid this, Steve came up with the idea of changing the surface around the outer set of 5 tuners to a relief so there would be some variation to the surface. After contemplating this matter for some days, he decided to use a section of sapwood veneer instead of a relief. After looking at the end result, I think that the sapwood succeeds in giving the surface more distinction.
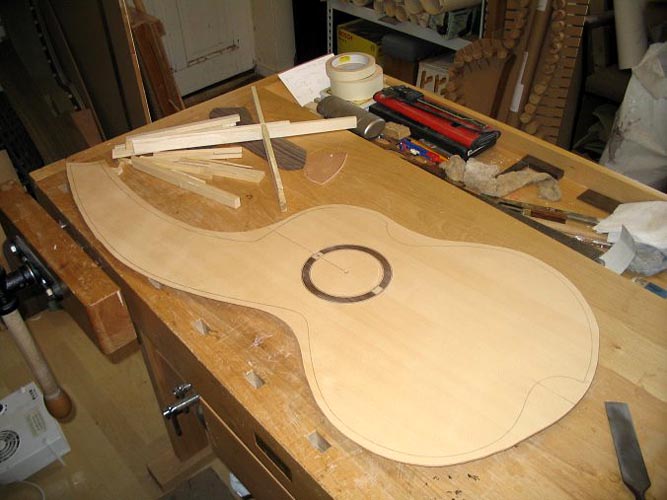
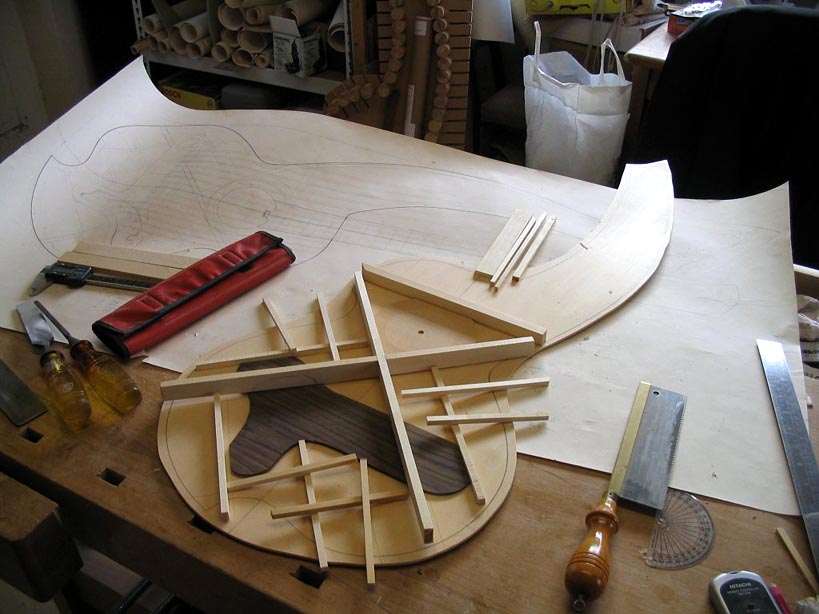
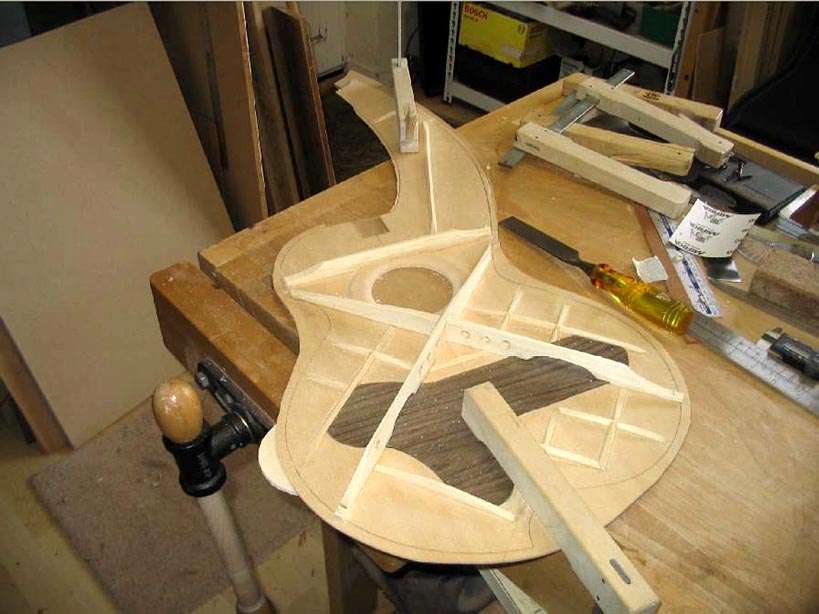
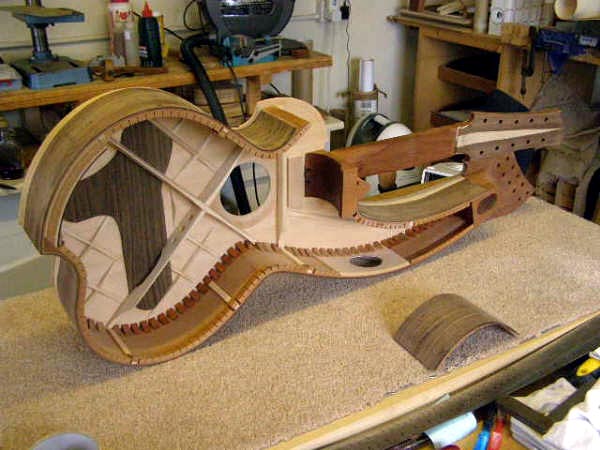
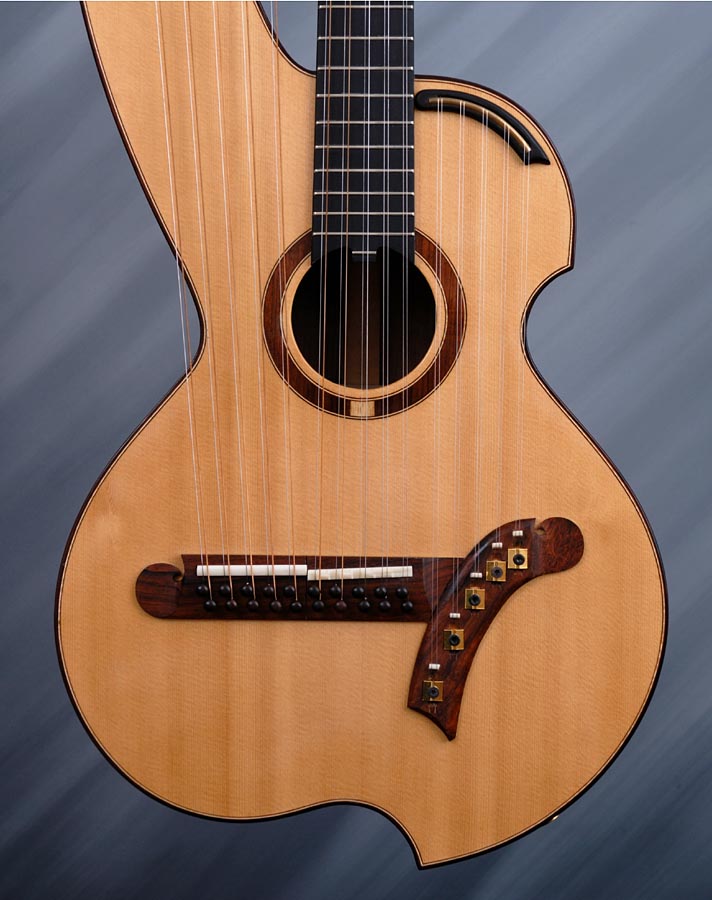
Final headstock veneers The Soundboard and Bracing
The AVC soundboard
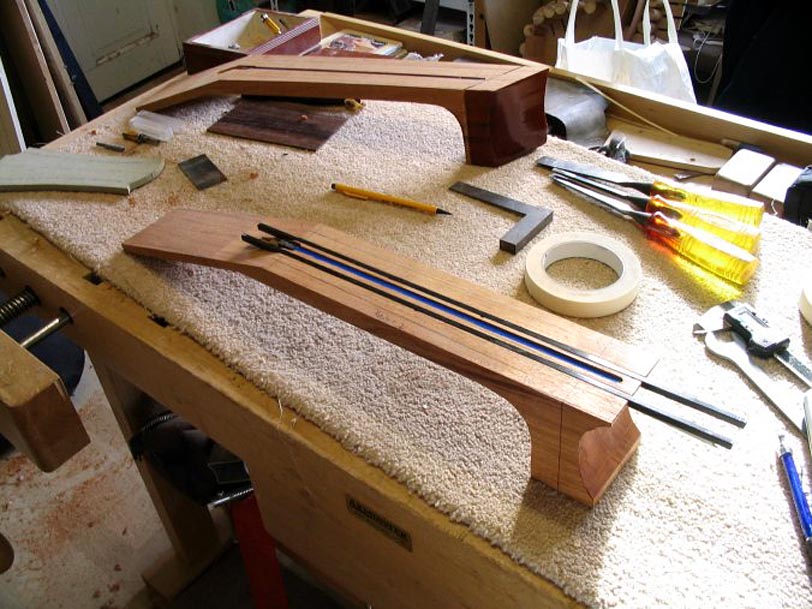
The Neck and Fretboard Steve made the neck out of Brazilian mahogany. To add strength and stability to the neck, he installed two composite rods into the neck. One was placed on each side of the truss rod.
The neck Although Brazilian rosewood is the traditional fretboard wood for the viola caipira, Steve thought it was wise to go with ebony since it feels much smoother under the fingers. I also thought ebony was the perfect choice. There were some specific requests I made regarding the fretboard that Steve was able to turn into a reality. My first request was to have the spacing between the courses similar to that of a classical guitar. What I’ve always disliked about trying to play fingerstyle guitar on various double coursed instruments was that the string spacing always seemed to be uncomfortably close. I wanted to optimize the AVC for finger picking and I believe that having the string spacing of a classical guitar would facilitate that. My second request was to have no fret markers on the
fingerboard. I wanted the fingerboard to be free from inlay. I have always
loved a clean, black ebony fingerboard with no distractions. I briefly
dabbled with the idea of adding my name on the 12th fret but
quickly dismissed it as absurd. I did have fret markers added to the side
of the neck for sanity’s sake. Also, as was mentioned in the first article, my third
request was for a third course fretboard extension. The Binding and Purfling The bindings were Brazilian rosewood with maple purfling. Four pieces of binding would be used for a regular guitar but a harp guitar like the AVC required six. Also, it’s common for harp guitars to not have purflings on the back and sides but Steve went the extra mile and did just that. The result was exceptional.
Binding and purfling bent to the proper shape
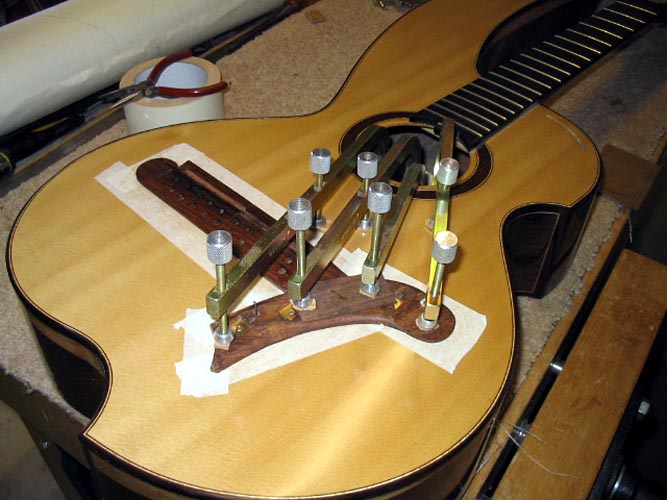
Steve installing the binding and purfling The Bridges At the beginning of the construction phase, there was some discussion on whether or not a pin bridge or pinless bridge should be used. In the final analysis, I thought it was best to keep the original bridge design and to use pins on the bass and guitar bridges. Steve has had a lot of success with his pin bridges and I thought it was wise to go with what we already knew worked well.
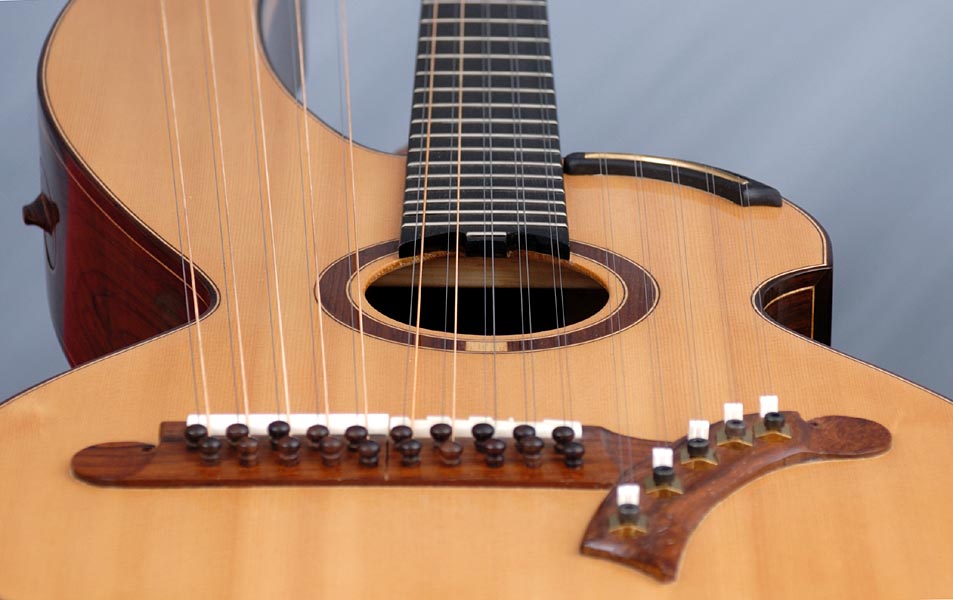
Installing the bridges
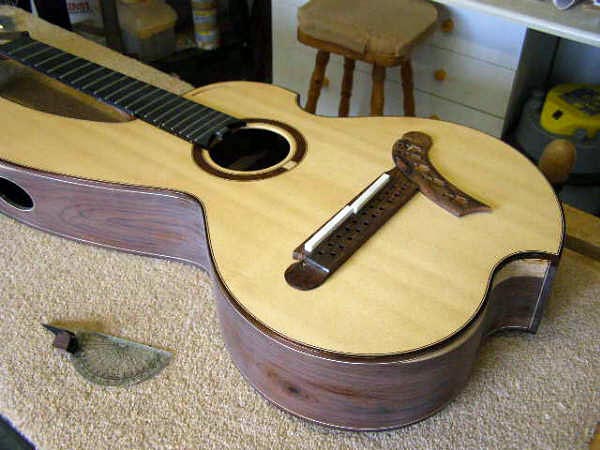
The bridges after installation The Pickups The viola caipira is not a loud instrument. The
longer I played my viola caipira, the more it became apparent that some
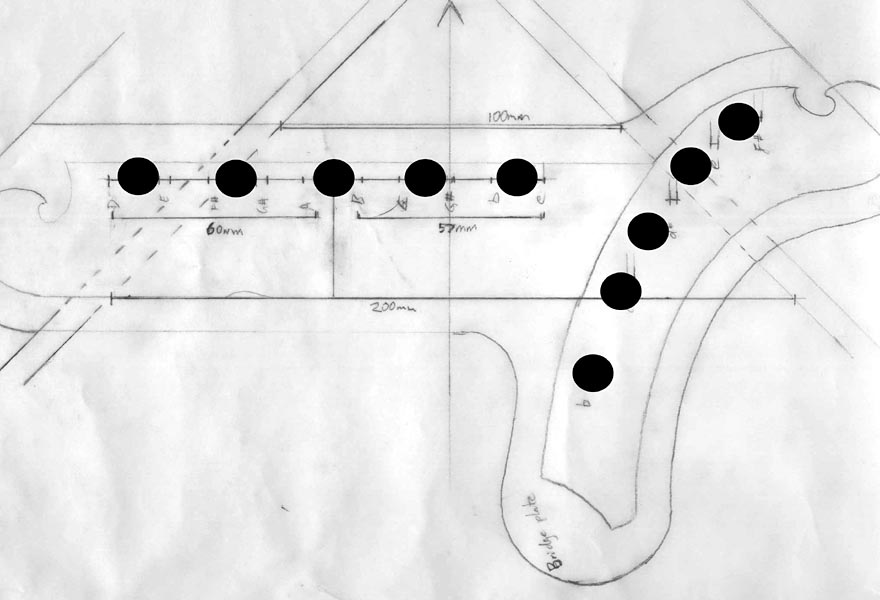
kind of pick up system would be necessary when playing live shows. After researching different types of pickup systems, I decided to go with harp guitarist Dan Lavoie’s recommendation and picked a custom K&K pickup system. Dan has toured extensively with his harp guitar and gave his K&K pickups an excellent review. The output of the system that was custom built for the AVC was split into two signals. One signal would be from 5 piezos that would be attached to the sub-bass and fretboard bridges and the second signal would be from 5 piezos that would be attached to the super-treble bridge.
K&K piezo placement When I ordered the pickup system from Deiter at K&K, they were able to include a gold plated jack cover that matched the other gold hardware on the instrument.
End pin jack for the K&K pickup system Phase VI – Innovation To bring this project to
completion, Steve invented some amazing features that I had never
imagined. Steve had free reign to do whatever he thought was best during
the entire construction process and what he came up with was
outstanding. During the construction of the AVC, there were some very important innovations that Steve had to create. It was not an easy process. Figuring out how to properly implement these new aspects pushed the completion date back for months. Most of these remarkable innovations came to fruition. His achievements that are documented in this section are a testament to his creativity and determination and I’m very appreciative of his efforts. Doubled Sides Since there would be a
lot of string tension with this instrument, it was important to find a way
to strengthen and stiffen the instrument without overdoing the top
bracing. A way that Steve achieved this was by making the sides with two
layers of wood. With the AVC, Brazilian mahogany was used for the inner
sides and Brazilian rosewood was used for the outer sides. When compared
to the front and back, the sides have very little effect on the overall
sound quality of the instrument. Steve first tried this construction
technique on a 21 string harp guitar and the doubled sides proved very
effective.
Since the instrument has a 2 piece single layer
Brazilian rosewood back, the warmth of tone that rosewood is known for
would be preserved. The Treble
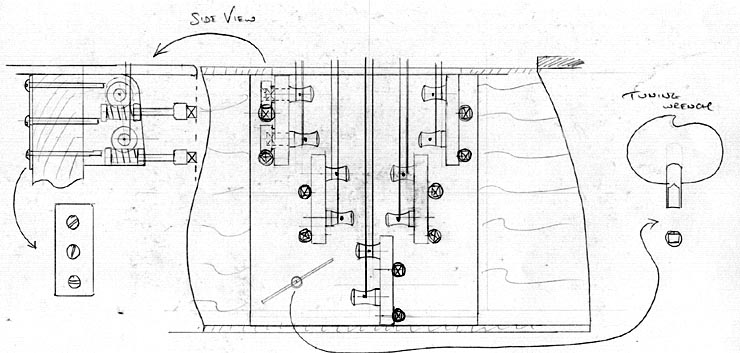
Tuner Unit Ever since we decided to go with five doubled super-treble courses, there was an annoying question that floated in the background for a long time which was, “How can ten tuners fit into such a small space?” An easy solution would have been to use zither pins but we preferred to use geared tuners since they would be easier to use and prove more accurate. With this in mind, Steve set out to design a custom tuner section. After some time, Steve got some help from a friend named Nick Smith who had an engineering background. Nick came up with an impressive solution that would incorporate ten custom geared tuners into a nice small section inside the upper bout of the body.
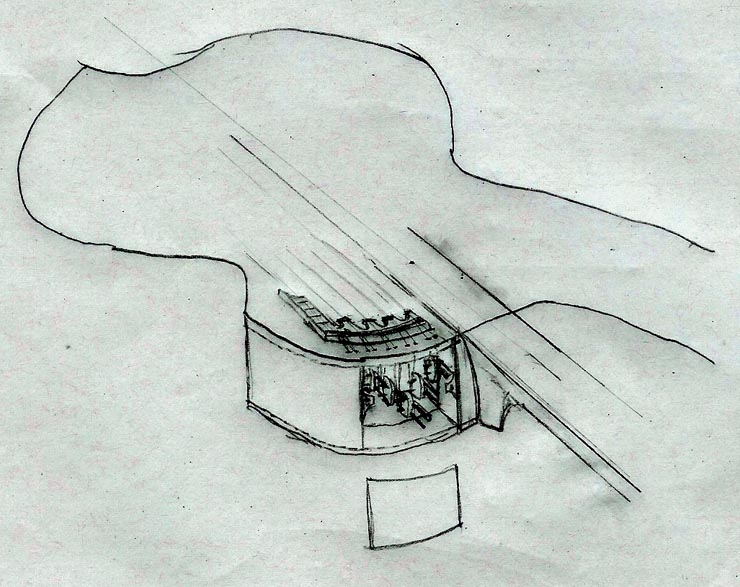
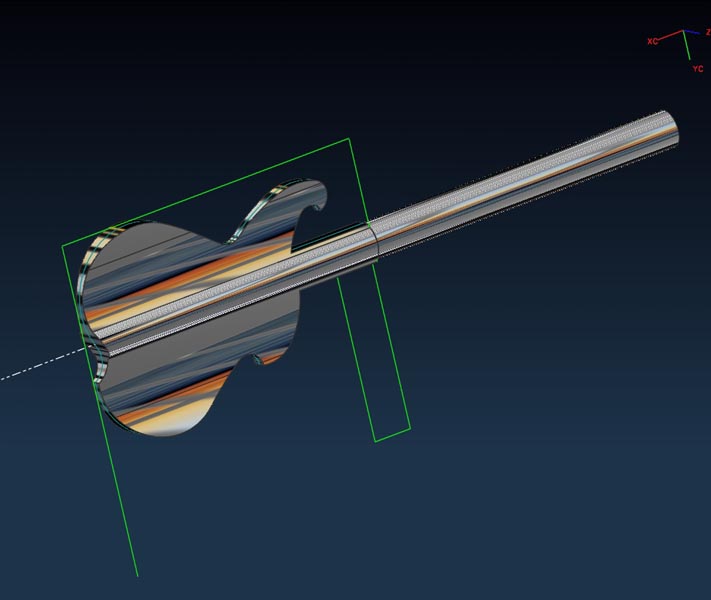
Nick Smith’s treble tuner design Based on Nick’s initial concept drawing, I drew up my own three dimensional version of the AVC body with the tuners installed so that I could get a better idea of what it would look like later in the construction process.
My attempt to draw a 3D version of Nick’s
concept. Steve and I initially agreed to go with this concept, but after looking into the price of making ten custom tuners, it became apparent that this solution would be too costly and was subsequently abandoned. At that point, Steve set out to figure out an alternate solution. One option he was considering was using something similar to the traditional tuners found on 19th century English guitars. These tuners are still used today on Portuguese guitars and violas.
Traditional tuners on a Portuguese viola Unfortunately, fitting a set of tuners in this configuration on the upper bout of the AVC would be very troublesome and ultimately impractical. Later, a solution master luthier Andy Manson used for tuning sympathetic strings on a sitar-guitar caught Steve’s interest. The tuners that Andy Manson used were actually the screws used inside a violin bow to tighten bow hair. These tightening screws are actually remarkably similar in function to the Portuguese guitar tuners. After discovering Andy Manson’s use of the
violin bow tightening screws, Steve had an epiphany! “Like
lightening it struck and
then I knew I was onto salvation. I was then able to fit 10 tuners within
the
space of 2”. The left
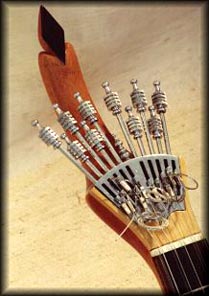
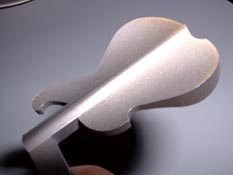
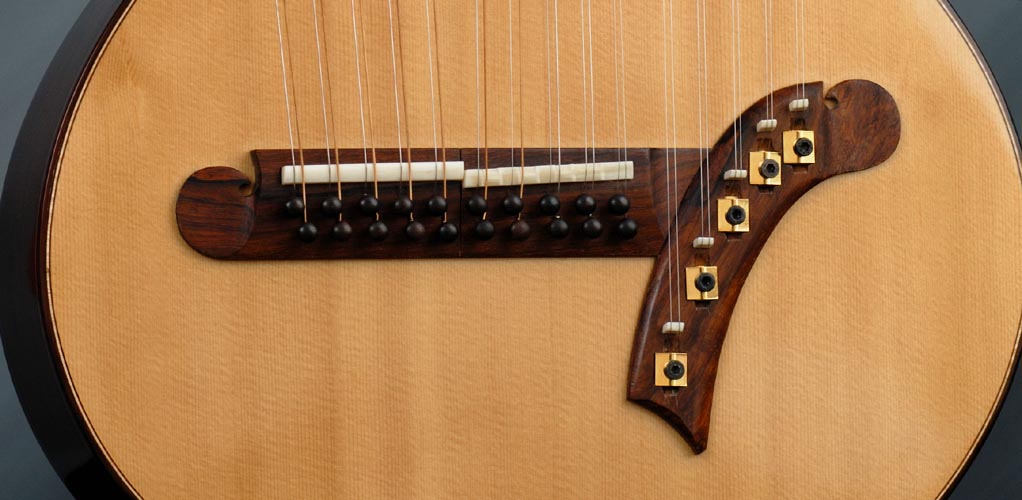
hand would not come into contact with the tuners either.” Now that Steve had found the course he want to take with the treble tuners, he set out to make a mock super-treble bank from plywood and scrap so that he could test this tuner configuration and see if they actually worked before incorporating the idea into the actual instrument.
Mock Up: Super Treble section
10 super-treble tuners (formerly violin bow
tightening screws) Instead of using pins for the super-treble bridge, Steve decided to use locking nuts that are used on electric guitars with tremolos. These locking mechanisms ensured that there would be no slippage while tuning the instrument. It also meant that he didn’t have to drill 10 more holes into the soundboard which is desirable considering that there would already be twenty holes for the main and sub-bass courses.
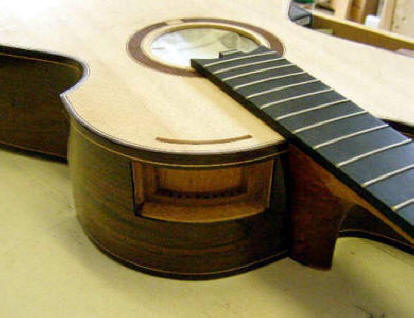
Treble bridge with locking nut Now that Steve had figured out a way to fit ten tuners into such a small space, he had to figure out how to incorporate them into the instrument itself. To do this, Steve designed and built a structure that would house the tuners. He named this component the “Treble Tuner Unit” or “TTU”. The first step he took in making the TTU was to create a tuner module that would house the tuners. This module would then fit inside the TTU.
The Tuner Module in line with its future
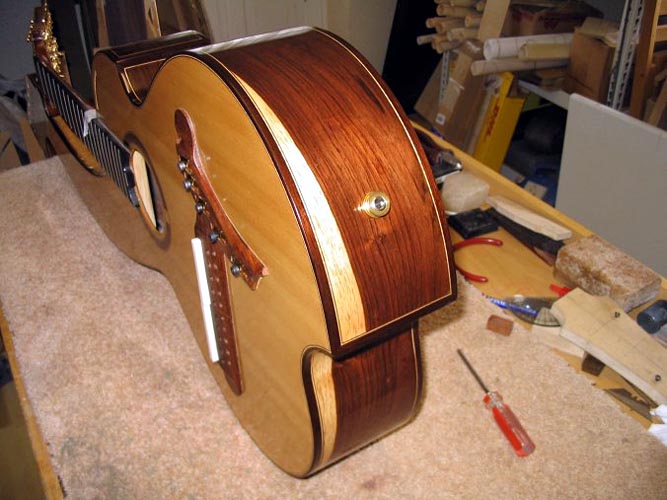
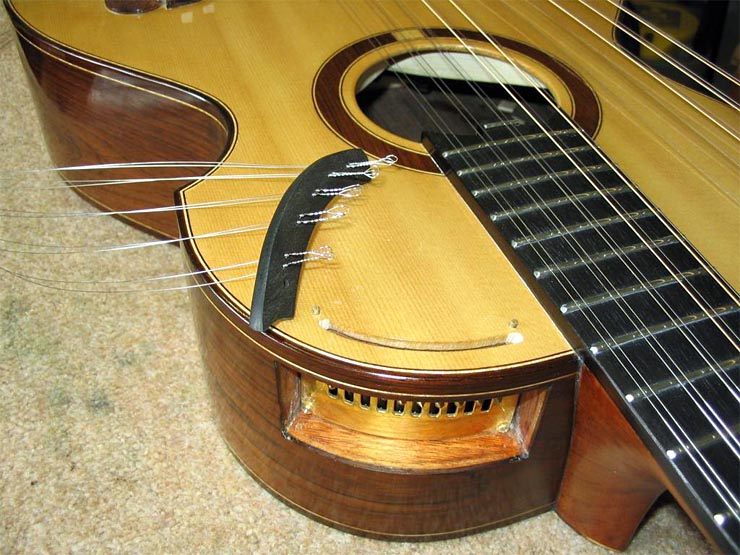
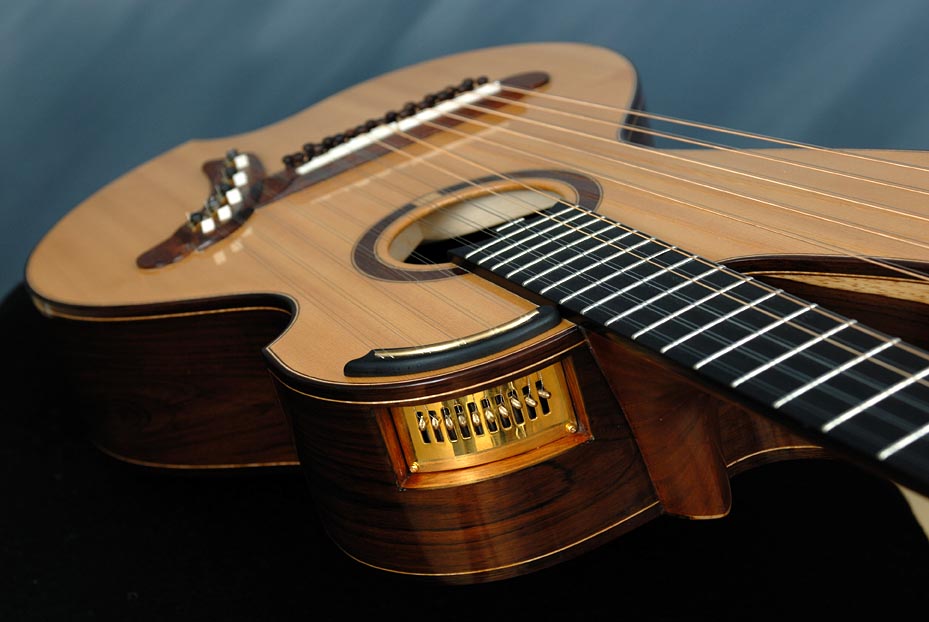
internal positioning. Once he made the module that would house the tuners, he set out to make the Treble Tuner Unit. Once he finished the TTU he would install it inside the upper bout of the AVC. Once Steve installed the TTU into the AVC, he glued the back piece of Brazilian rosewood on and sealed the wood. He then cut three TTU access openings into the body. The opening on the side of the upper bout gave access to the tuners for restringing and maintenance. The opening on the top of the instrument is a curved slot where the strings will pass through before being stretched across the soundboard and the curved opening on the bottom is where a tuning key would be used to tune the super-treble strings.
The Treble Tuner Unit – Top slot and Access
area for changing strings Before Steve fit the treble tuners into
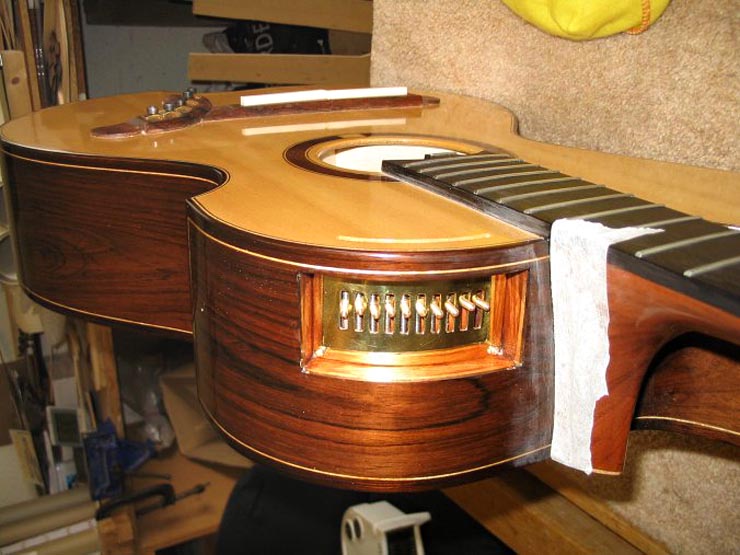
the TTU, he created a brass grill that would protect the tuners and keep
them in line when turning them with the key. Before he installed the grill
plate, Steve’s friend
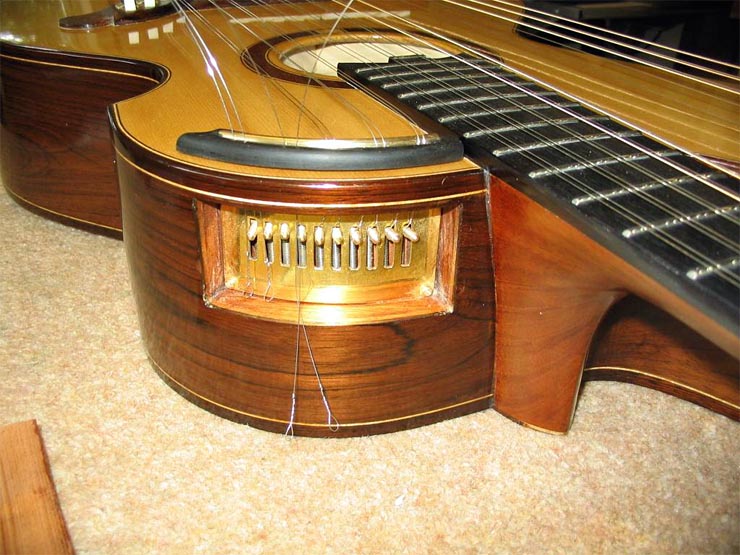
AVC TTU with newly installed gold plated brass
grill and tuners Once Steve installed the treble tuners
into the TTU, setup the bridge and installed the saddle and nut covering
the slot where the strings pass through the soundboard, there was one last
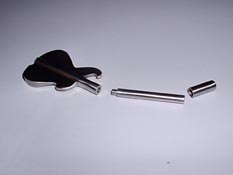
thing we needed in order to test out the TTU – the tuning key. Steve was planning on making the tuning
key himself but it soon became apparent how difficult it would be to drill
a square hole to the exact dimensions needed to tune the treble tuners. We
needed to find someone who had the tools to make this key. This dilemma
was on my mind when I visited my parents in When I was there, I noticed an
interesting metal object on the table. I asked my father where it came
from and he said that he made it in the shop where he works. My father
works for a company that manufactures titanium and stainless steel parts
for knee and hip replacements and he told me that he has access to scrap
metal and would occasionally go in and use the machinery there to make
some interesting things from the scrap. Then a light bulb went off in my head
and I asked him if he could make a tuning key... He said, “Shouldn't be
a problem!” I told Steve about this and he sent me a drawing with the
tuning key's dimensions. After I got back from After I told my father about this idea, he sent me another CAD drawing with the new design.
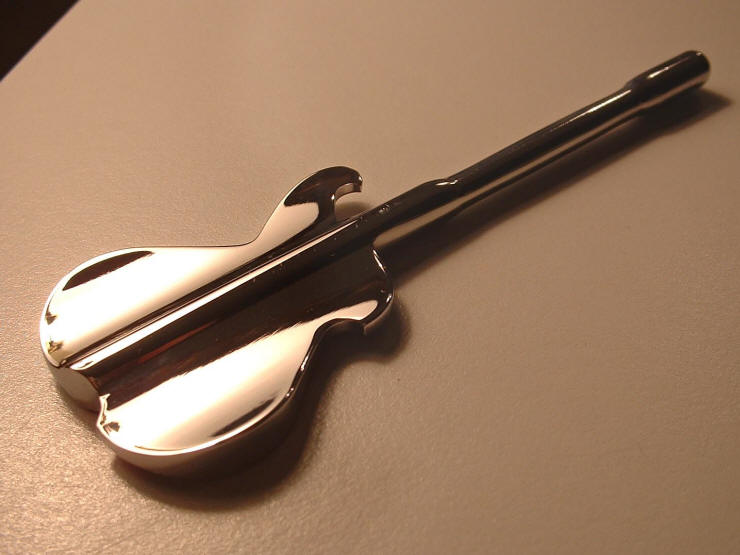
Final AVC Key Design After Steve and I gave him the thumbs up, he then made the key and shipped it to Steve.
Building the key
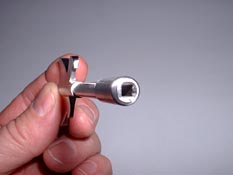
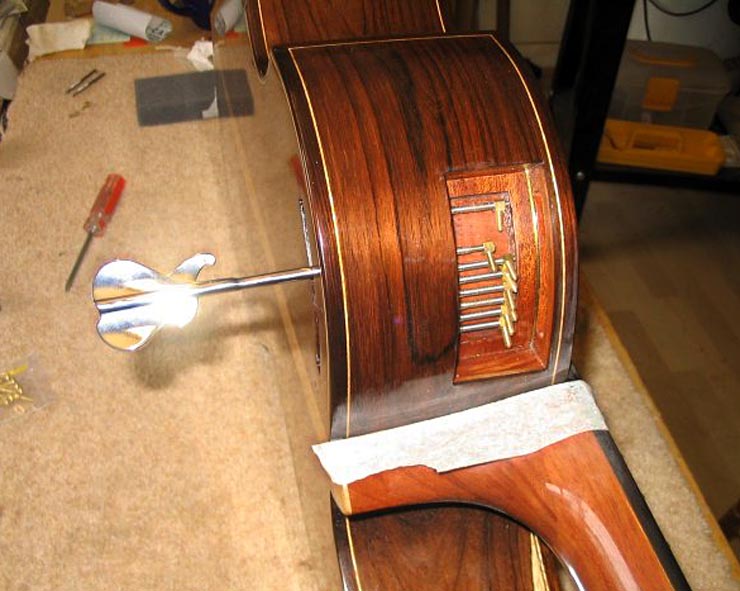
The AVC Treble Tuner Key When the key arrived at Steve’s shop, he inserted it into the access slot to tune the tuners – It worked perfectly!
The Treble Tuner Key inserted into the access
slot on the back of the AVC Once all the strings were on the treble section, he strung up and tuned the super-treble section. Tuning the super-treble bank takes some time. Here are the steps:
Steve was very happy with the result. The sound of the double super-treble courses blended seamlessly with the fretted courses. After struggling to find the right solution for this aspect of the AVC, Steve was victorious. The Treble Tuning Unit is an unqualified success! Caposts The day after Steve inspected my
original viola caipira in The conversation could have ended there
but Steve went on to explain the concept that he was thinking about that
involved making a post that would have a capo-like device clamp down on
the strings. He named this invention a “capost” since it would
essentially be a combination of a capo and a post. After Steve finished researching and
developing the caposts, the end result was something a little different
than previously imagined. Instead of being a platform that the strings
would be clamped to, it would be more like a special sharpening lever for
two strings. If you wanted to sharpen the pitch, you would pull up on a
lever that would exert pressure on the strings, thereby increasing the
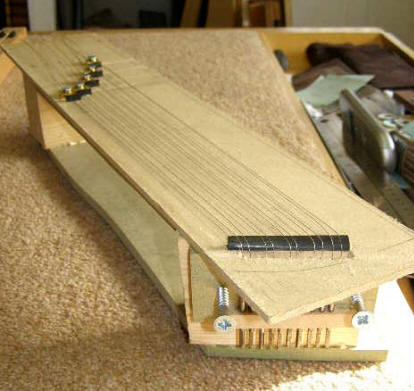
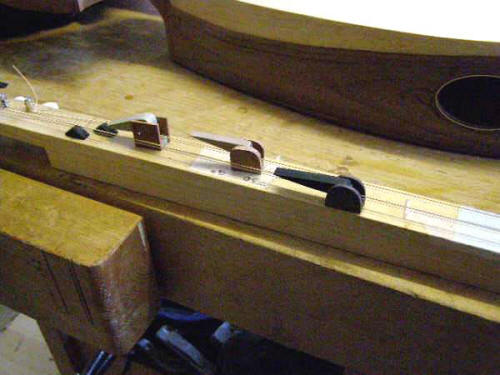
tension which would then raise the pitch. In order to make sure that the capost would change the pitch exactly one half-step, he had to do some extensive testing which required that he make a mock sub-bass section. If he could confirm that these caposts work on this dummy unit, then it would be safe to incorporate them on the AVC.
Capost Prototypes being tested on the mock
sub-bass section. However, when it was time to install and
test the caposts on the AVC, Steve discovered some intonation issues.
Also, one of the caposts broke during an adjustment. In the end, Steve
decided that in order to make the caposts work properly, they would have
to be made primarily out of metal and not wood. Since this prospect would
have added even more time and cost to the project, I had to put the
development of the caposts on hold. It is my hope that, with some collaboration between Steve and my father, we might be able to revisit Steve’s capost concept in the future and build the metal-based caposts for the AVC. The
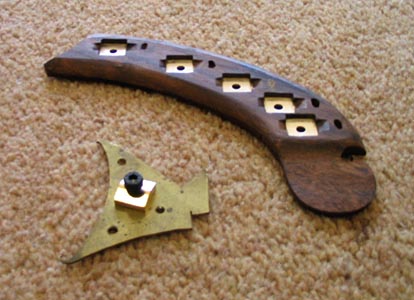
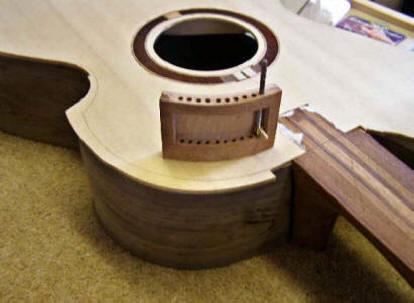
Port Hole Another intriguing feature that was incorporated into the AVC was the addition of a port hole on the side of the harp arm. After playing the harp mandolin that Steve brought to the 3rd Harp Guitar Gathering and being very satisfied with the effect the port hole had on that instrument, I decided that I wanted to include one on the AVC.
Sedgwick harp mandolin with port hole. With my experience playing the viola caipira, I know that this instrument was not very loud to begin with. A port hole would act like a little monitor speaker attached to the harp arm and help me hear what I was playing more clearly. Once we decided on having a port hole, we decided to use the piece of wood that he cut out and make it a port hole cover.
Once the AVC was complete, Steve used a system of magnets to keep the port hole cover in place and added a nice handle to the top of the cover so it would be easy to take on or off. Another interesting thing I discovered was that using the port hole cover actually helps in reducing feedback when plugged into guitar amplifiers. The Headstock Bracket There is a prevailing thought that having the bass headstock and the guitar headstock joined in some way enables a harp guitar to produce a better overall tone. Steve explains it this way, “Less Kinetic energy is lost when the heads are joined by a bracket or the neck is reinforced with carbon fiber rods, thus more string (Kinetic) energy goes to the bridge rather than into the neck, resulting in more volume and tone.” I liked this idea
of attaching the headstocks but the
thought of permanently attaching them didn’t particularly interest me
since it would make truss rod adjustments much more difficult. Therefore,
Steve and I decided to use a bracket to attach the headstocks. Once Steve
made the bracket out of the same brass that he made the treble tuner grill
from,
Headstock bracket Highlights During the long design and construction
process, there were a couple of moments that stand out for me. These
pictures represent those moments:
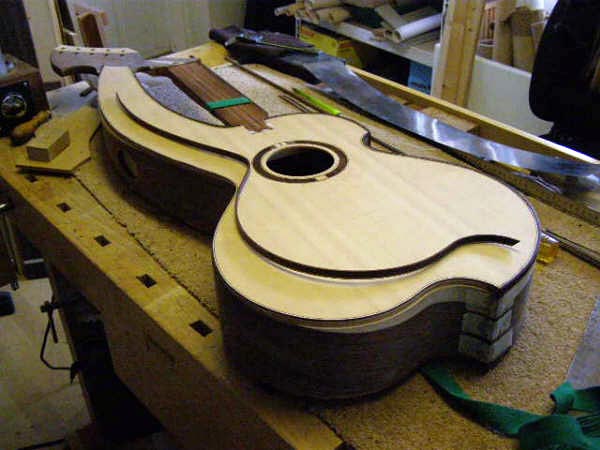
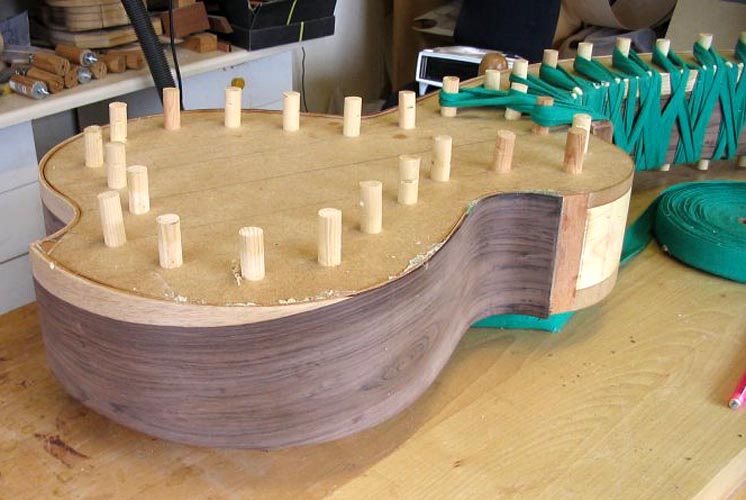
The last picture of the AVC before the back was
glued on.
2/3rds Strung - This is the last picture I got from Steve before I picked up the AVC Phase VII – Completion Steve found me
at the arrivals section at Gatwick airport. I wasn’t hard to find
since I had a custom green AVC soft case on my back.
He invited me back to the shop so we could finish stringing up the
instrument. It does take a while. At 30 strings, it’s like stringing up
5 regular guitars!
Tuning the AVC I was stunned when I finally saw the instrument on his work bench. The first thought I had was “This instrument demands respect”. I think this feeling came to mind because not only does it represent an amazing amount of effort and toil on Steve’s part, there is also an underlying purpose to every aspect of the instrument. At first glance, it may seem like a whimsical creation but upon closer inspection, there’s sound logic behind all of it. After taking home the instrument and
after practicing on it daily, I can say that this instrument has surpassed
all expectations. The sound is even across all the courses. The tone of
the instrument is distinctly that of a viola caipira. The courses have
excellent pitch clear up to the highest fret. The back of the neck is
super smooth. It seems like the kind of surface you’d find on a high-end
cello neck. The pick up system works perfectly. All the tuners stay in
tune very well. And the best part about
this instrument? The musical possibilities are endless!
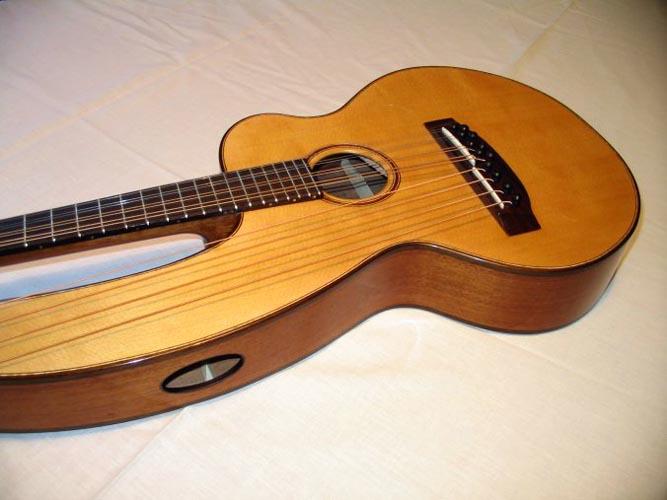
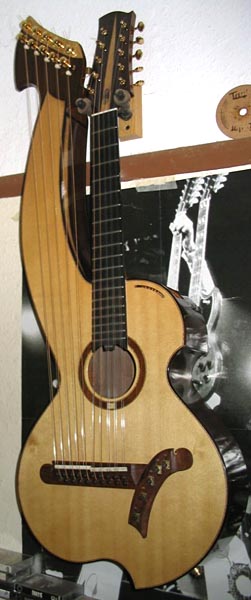
Finished
Special
thanks to Steve for having the vision to turn the concept of the arpa
viola caipira into reality.
|
||||||||||||||||||||||||||||||||||||||||


|
If you enjoyed this page, or found it useful for research, please consider supporting Harpguitars.net so that this information will be available for others like you and to future generations. Thanks! |
|
|
|
All Site Contents Copyright © Gregg Miner, 2004,2005,2006,2007,2008. All Rights Reserved. Copyright and Fair Use of material and use of images: See Copyright and Fair Use policy. |