Today’s blog is a wonderful, in-depth guest article by a very thorough and articulate gentleman (Phil Schappert, PhD, of Nova Scotia, also a fine fingerstyle player and composer) who successfully (and easily, he says!) just finished adding sharping levers to his Timberline harp guitar.
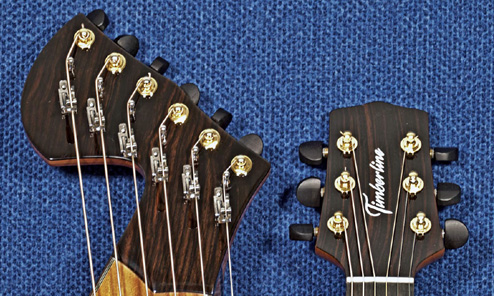
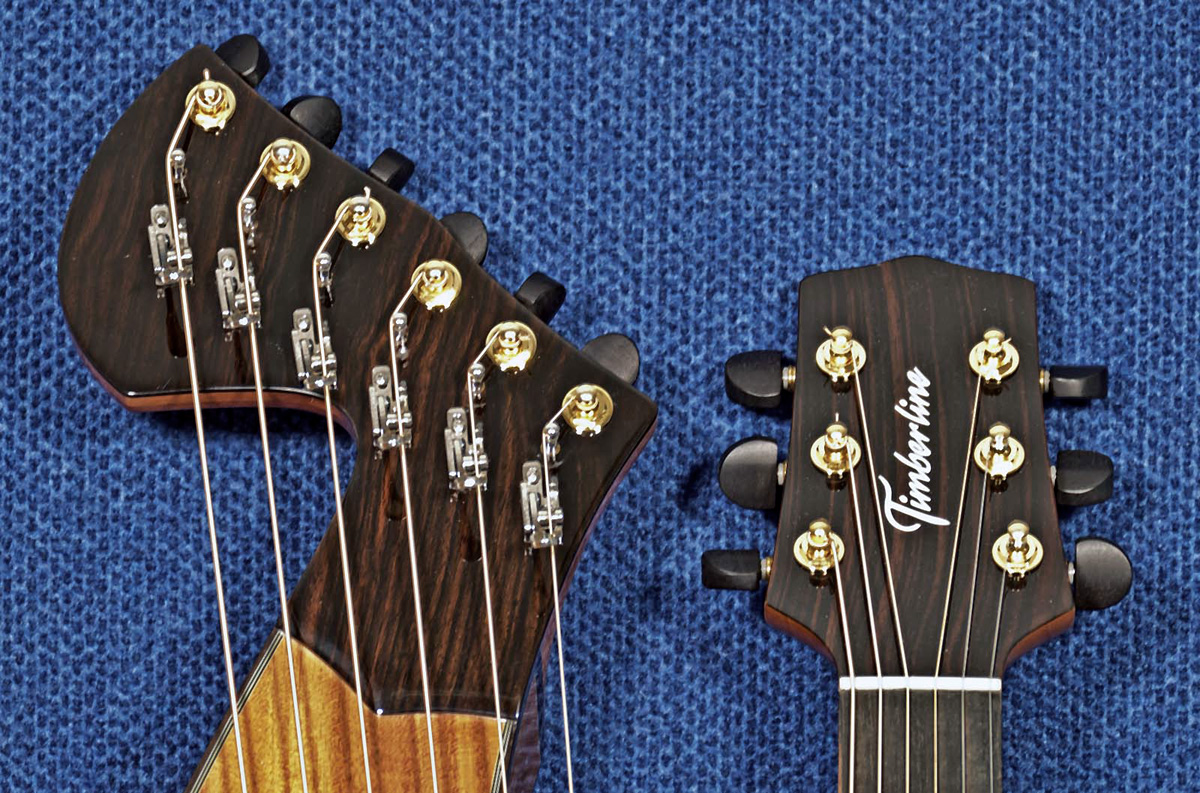
I’ve been waiting for this first experiment to be completed ever since designing the sub-bass headstock for Timberline Guitars over two years ago. Unbeknownst to me, the company’s owner Rob Smith had considered the option (using Truits) on his original prototype for Jamie Dupuis (who decided against them). When I did my re-design of the instrument, I went through dozens of extreme-to subtle headstock variations. My final drawing was slightly less bulky than it is now – it was at the urging of Frank Doucette that I modified it to include just enough real estate for one to be able to add future sharping levers…in theory. So, I’m glad I was proven right!

My other decision was to leave off the common sub-bass “nut posts,” something I inadvertently “invented” many years ago when I did an experiment with my pre-1900 Knutsen and removed its brass screw posts. I liked it and just left it like that, and soon Duane Noble and subsequently many other luthiers followed suit. By dumb luck, this configuration also allows room for future sharper options.
With modern geared sub-bass tuner knobs protruding from the top, my next discovery was that there was not – nor need be – a standard tuning direction for the buttons. Meaning, should they turn CW or CCW? Surveying several builders and players, I discovered that everyone had their own preference, and many (myself included) had no preference. Unlike neck tuners, neither direction on the subs felt necessarily “right or wrong,” as they are above and more or less perpendicular to the neck tuners, thus feeling quite different and not “instinctive” either way.
Thus, the Timberline can be strung for the players’ “tuning logic” preference, with the string coming off the left or right side of the shaft. (The difference doesn’t affect the left subs-to-neck gap significantly.) As you’ll see, obviously the strings should wind to the left/far side when adding levers, and this is how they’re typically shipped.
Phil will now take us step by step through his process. In hindsight, we regret that he didn’t take “in process” photos (he hadn’t planned to write a 2800-word article!), but his verbal details seem pretty clear. This information will certainly prove indispensable to all those who have asked me about levers, but should also be helpful to other harp guitar builders and players.
U Got 2 B Sharp: adding Sharping Levers to a Timberline Harp Guitar
By Phil Schappert
I recently decided – after much humming and hawing – to finally take the plunge and buy a harp guitar. The expense of a harp guitar has always been overwhelming, to be sure. Thankfully, Gregg and Rob and the new Timberline line of harp guitars have largely removed that stumbling block, but even more daunting for me was that I’m a full-time DADGAD player. To make matters worse, I also use a variety of partial capos in much of my playing and writing, so key/mode changes are frequent and I honestly dreaded the need to retune the sub-basses for every piece. Since partial capos offer a way for me to play in a wide variety of “tunings” – without actually having to retune anything at all and without actually changing the intervals between the strings – the thoughts of constant retuning of the sub-basses on a harp guitar after simply placing a partial capo, kept me watching from the sidelines.
Here’s an example of my issue: In DADGAD, the “key of D” seems pretty much a foregone conclusion. But “D” could use a leading C# – though this would be C natural in Mixolydian mode or in D minor – and an F#, too, would be useful – but this would need to be an F natural in D minor. Now add a partial capo (a modified banjo capo in this case) on the high 4 strings at the 3rd fret and the open string tuning becomes DAFBbCF. The C and F naturals will work but now I also need a Bb (and, I have to admit, it would be nice to have it for Dm too). But the relative minor of D major, B minor, needs a B natural. Perhaps you begin to see the problem? Depending on what kind of, and where, a partial capo is placed, the basses need to change accordingly.
The default Timberline bass tuning of E (or F) GABCD, low to high, with the guitar already tuned down to D, wasn’t really going to work for me. I thought I’d have to drop everything a full tone to DE (or F) GABC to be useful and that would make that low D a veritable “bridge cable!” So, taking a pointer from Frank Doucette, I decided to try his modified Bennett-tuned sub-basses, that is: GABCEG low to high, though I’d still like to be able to get – at a minimum – that Bb, C# and F#, as well as an F natural, without having to actually retune the basses. I decided that my optimum tuning would be a base of GABbCEF# with sharping levers on each string that would give me access to G#, Bb, B, C#, F and a high G. Set the levers up for the 3rd and 4th string and I would have the sharp 3rd, 7th and the B natural needed for D major or B minor. Raise the lever for the 1st, 2nd and 4th strings and lower the 3rd string lever and I’ve got GABbCFG for the key of D minor, etc.
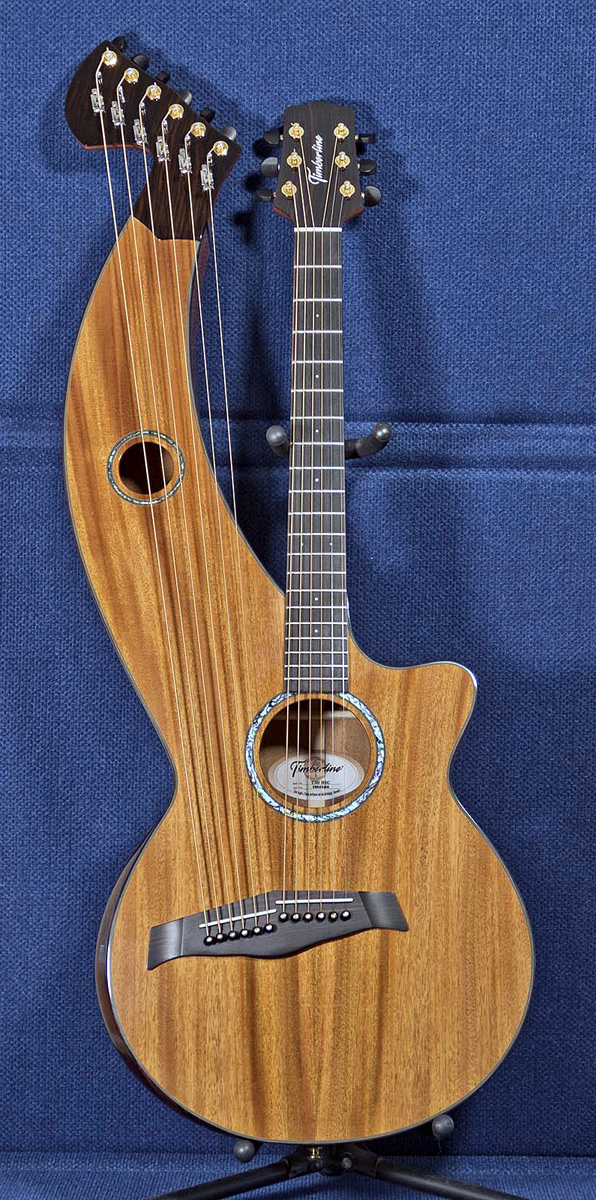
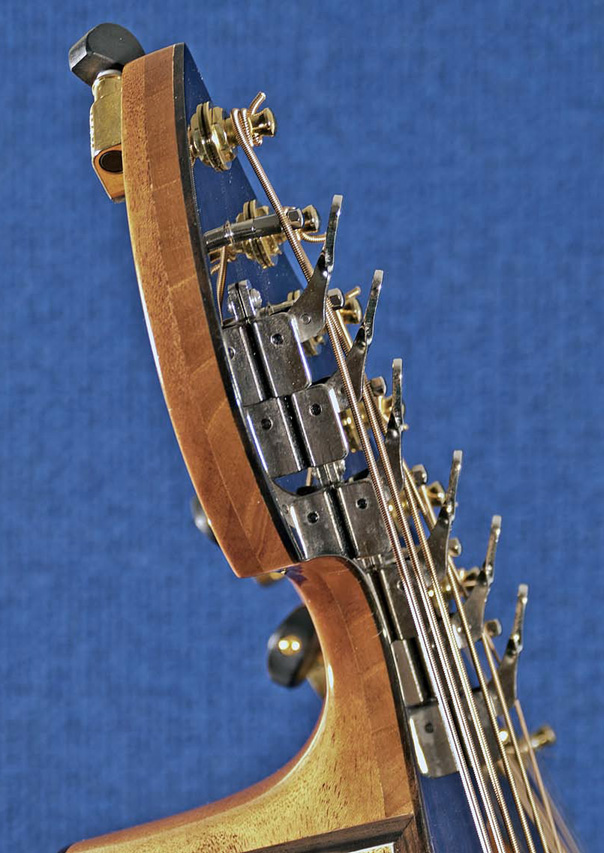
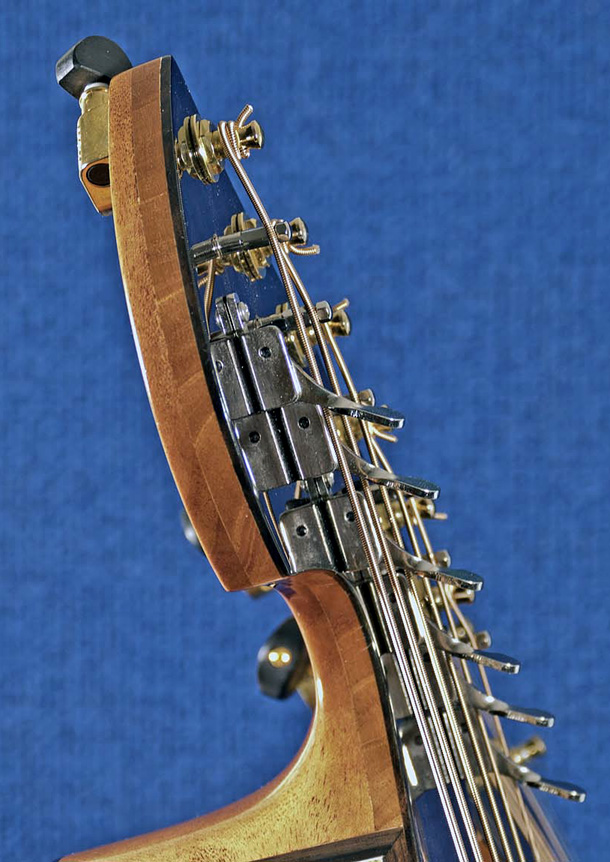
In my early correspondence with Gregg he suggested that it should be possible to add sharping levers to the sub-bass head of a Timberline harp guitar, and that he and Rob had worked the design to ensure that that was possible. However, I wondered if there was enough space for a lever on that 1st high bass string. Then I saw some photos of one of Rob’s early prototypes that had nut pins that shifted the strings toward the bass side of the head giving more room for a lever on that high string and I began to see the possibilities myself. So, I took the “bull by the horns,” ordered a Timberline T30HGc, and began a hunt for sharping levers.
What are Sharping Levers?
For those not familiar with sharping levers (not sharpening levers), their singular purpose, as the name suggests, is to raise the free-length pitch of a string by a half step. These are common on some diatonic instruments, especially Irish harps, but are also found on the Finnish kantele, the Turkish qanun and, not too surprisingly, the sub-bass strings of harp guitars. Of course, there are dedicated tuning machines that are capable of half and even whole step tuning changes, either during or between pieces, but they aren’t cheap (!) and are often dedicated to specific tasks (e.g., bass extenders, Scruggs tuners) and all too often are limited by string size or too-low gear ratios. Sharping levers, by comparison, are relatively cheap, simple mechanical devices that are most often used to set strings to pitches for a specific key or mode (though modern harpers do flip them up or down during performances these days).
There are a number of different kinds of levers, from old-fashioned “twist blades” that were used on wire-strung harps (but changed string-spacing because they displaced a string to the side), to the simple early Robinson levers and on to more modern, and smaller, Loveland, Truitt, Camac, and Rees levers, among others. They also come in a variety of materials and colours but are most often made of brass, some chrome, nickel or even gold-plated, or may have metal or Delrin lever arms or handles, that may be coloured to indicate specific strings or pitches (e.g., C and F strings on diatonic harps are typically red and blue respectively so sometimes have colour indicators on the levers to match the pitches). Essentially all of the modern levers work similarly: they either depress or – more commonly – lift the string to shorten its scale length while maintaining the instrument string spacing.
I decided on Rees Harps levers because they are small, well-made, have an excellent reputation among harpers and harp builders, are relatively cheap and are readily available. I ordered six levers, six threaded nut pins (called “bridge” pins by the harp community) and the hardware needed for lever installation directly from Rees Harps. Total cost, not including shipping, was $70.20. The nut pins are an integral part of sharping levers that are needed to lift strings up so that the levers have space to work AND – importantly—they allow fine adjustment, or regulation, of the pitch of a semitone-raised string when the lever is up. Another deciding factor was that the general working distance for Rees levers on thick-ish bass strings is 3/8” while other levers need 7/16” (or more) to the bottom of the string above the surface of the instrument.
After the levers and pins had arrived, I realized that I also needed a specific size drill bit, a #25 bit (0.150” or 3.8 mm diameter) to drill the pilot holes for the very fine thread on the 4 mm (0.158”) nut pins. A #24 bit (0.152” or 3.86 mm) would also work but I think that anything larger wouldn’t leave much for the threads to grab. Note that a #25 bit is the size needed for the pilot hole for common 10-32 screws so they seem to be more commonly available than other sizes. This bit was another $2.50.
Here’s a complete list of the materials needed to install the nut pins and levers on my harp guitar: the 6 levers and screws, 6 threaded nut (bridge) pins, a drill with 1/16” and #25 drill bits, 4 mm nut driver, size 0 Phillips head screwdriver, wide painters masking tape, a sharp pencil, a small hammer and dimple tool (e.g. a finishing nail) to mark drill locations, a small 6” or so see-through ruler, a sturdy 18” or longer ruler, a good electronic tuner (something that shows cents deviation is recommended), a good padded surface on which to work and a support for the bass head (a piece of 3/4” x 3” board about 8” to 10” long will work).
Installing the Nut Pins
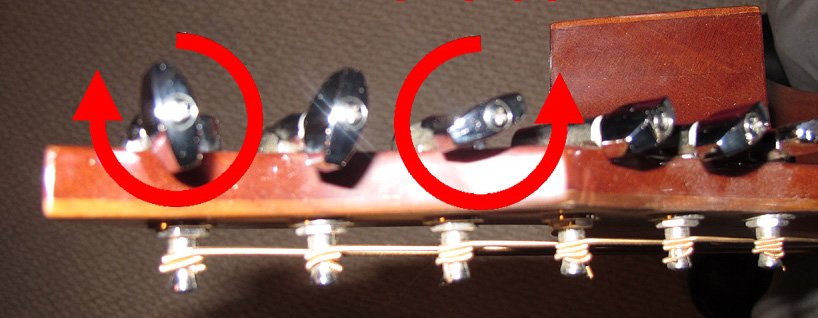
The following is specific to Rees levers and pins but most other levers will have similar procedures. With my sub-basses tuned to GABCEG (using 0.070”, 0.065”, 0.060”, 0.056”, 0.047” and 0.039” strings), I used some wide painters tape to mask off the area in front of the tuners on the sub-bass head, both above and below the head. It looked like a string displacement of only 1/4” away, towards the low bass side of the head, would provide the space needed to fit the lever on the high string so I pencilled a line on the tape 1/4” away and parallel to each of the strings using an 18” long ruler. Then I added lines to cross those, parallel to the angle of the tuner posts, at 1/8” increments from 1/2” to 1” from the approximate centre line of the posts.
I somewhat arbitrarily decided – because I could see on my spouse’s Irish harp that the nut pins on thicker strings needed to be further away from the tuner posts (presumably to keep the angle of the string between the pin and the post shallow enough that the string doesn’t slip off the tuner post) – to place the nut pins at 7/8”, 3/4”, 5/8’, 5/8”, 1/2” and 1/2”, low to high respectively, from the tuners. Before continuing, obtain or rip a piece of 3/4” board (actually 5/8” thick) long enough to fit under the head. It needs to be about 2-1/2” high, so a 3/4” x 3” piece of board x 10” long works well. Tape one long side of the 5/8” thick board to protect the finish and the bodies of the tuning machines on the underside of the head. Use the board to support the head by placing it parallel to, and touching, the tuning machine housings under the head, before doing any hammering or drilling.
The hardest part of this entire procedure (!) was using a hammer and a sharp-pointed nail to mark the nut post hole locations. I’ve often drilled pilot holes to install strap buttons or installed pickups in guitars, though only if the end block is already drilled and reamed for the jack, but I’ll tell you that drilling the sub-bass head was a whole new level of anxiety! One thing that makes it a bit easier is that the nut pins are about 1-1/4” long while the head is only 5/8” thick so once the drilling locations are dimpled there’s no need to worry about the depth of the drilled pilot hole. Use the #25 drill to drill the six holes for the nut pins all the way through the head and into the support board. The tape on both sides of the head will minimize finish or wood chipping/splintering – as will using a new, sharp drill bit, a high drill speed and drilling entirely through the head and into the support board. Remove the painters tape from both sides of the head and, using a 4 mm nut driver, install the threaded nut pins. There will only be one or two threads visible on top when the pins begin to protrude from the back of the sub-bass head. However, because the ends of the pins are tapered and nicely finished, I don’t think it looks bad at all.
Installing the Levers
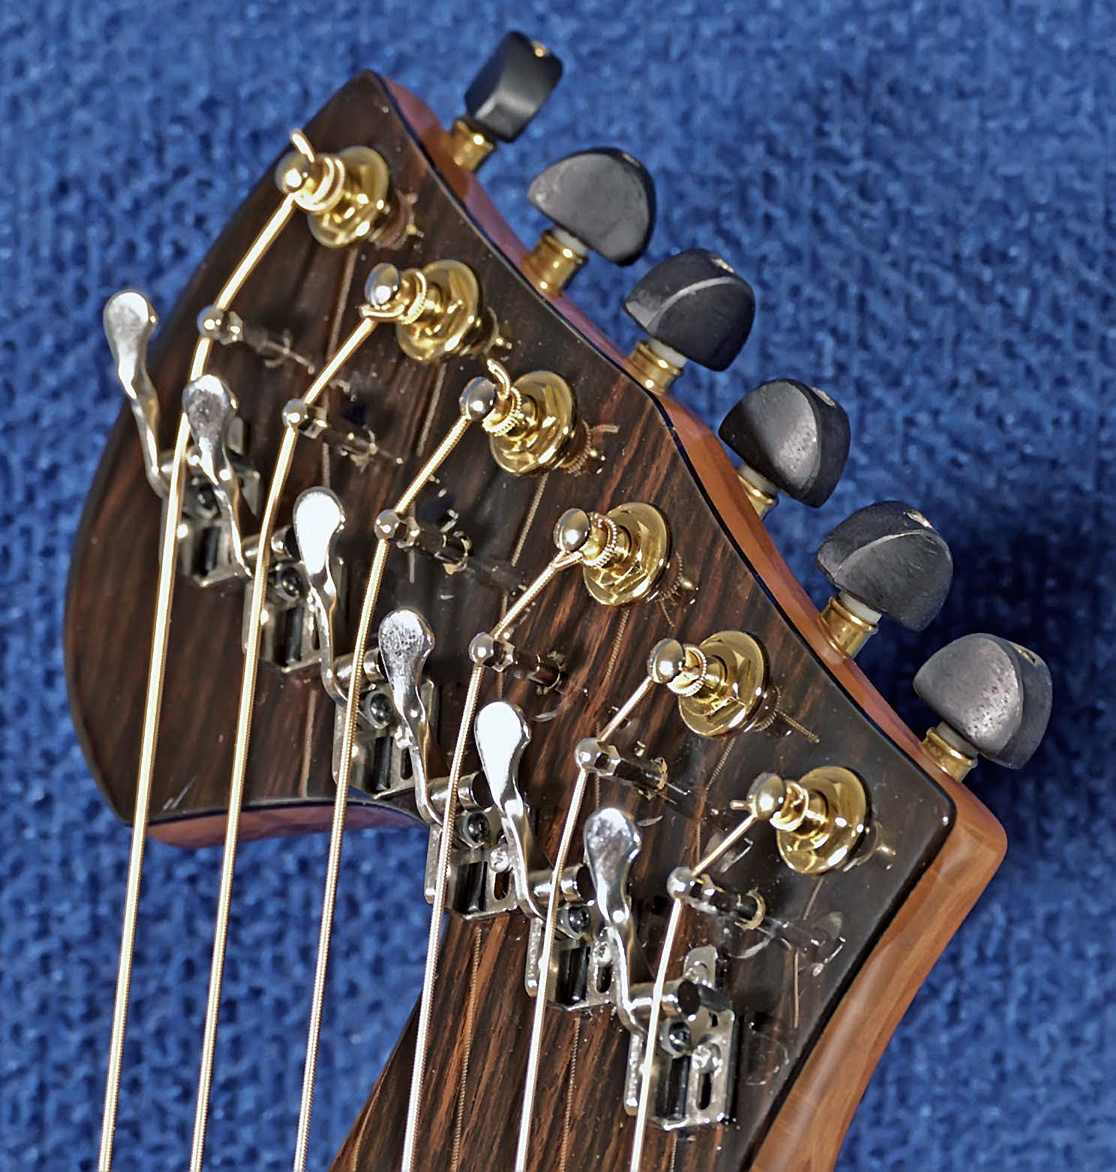
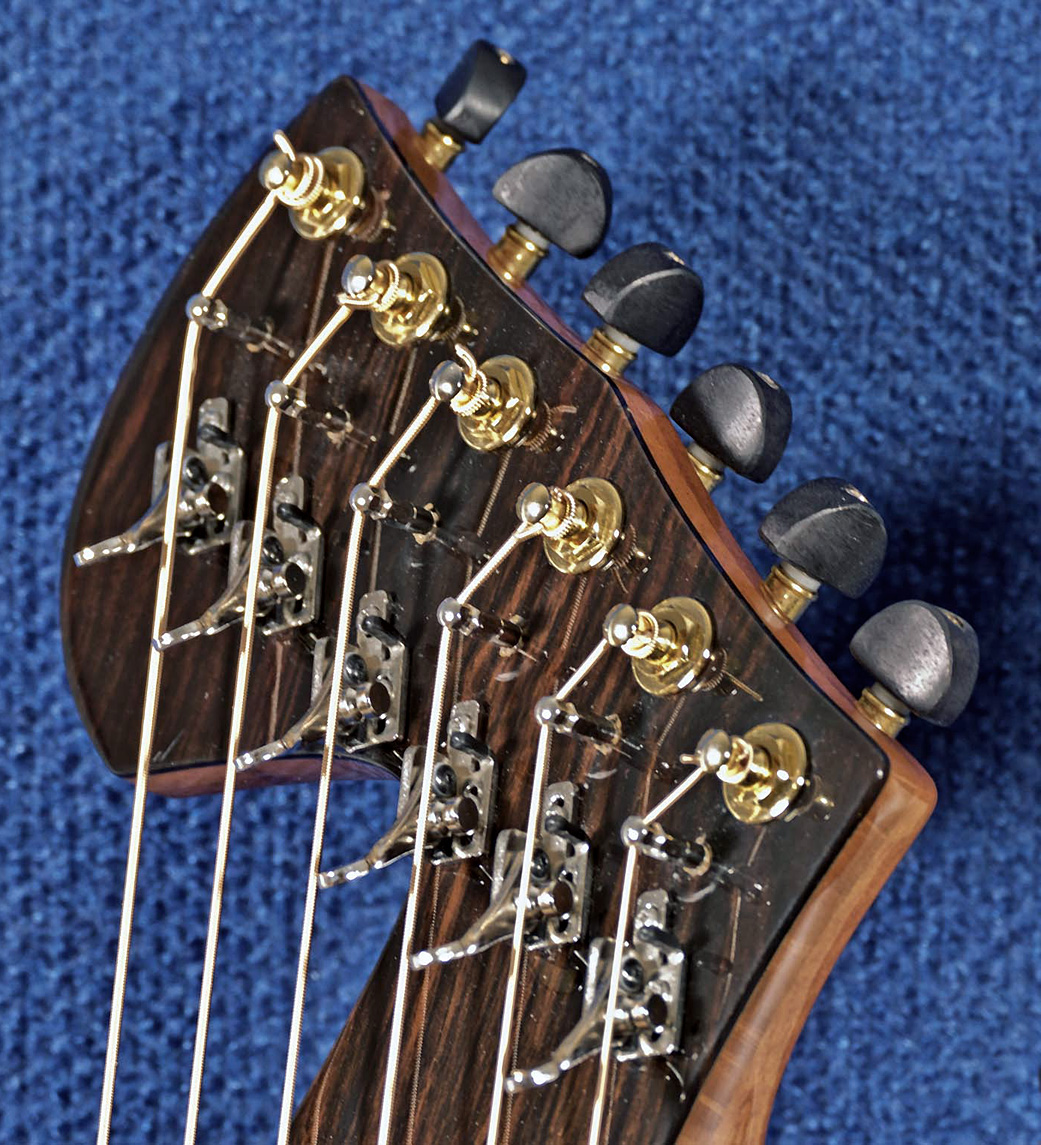
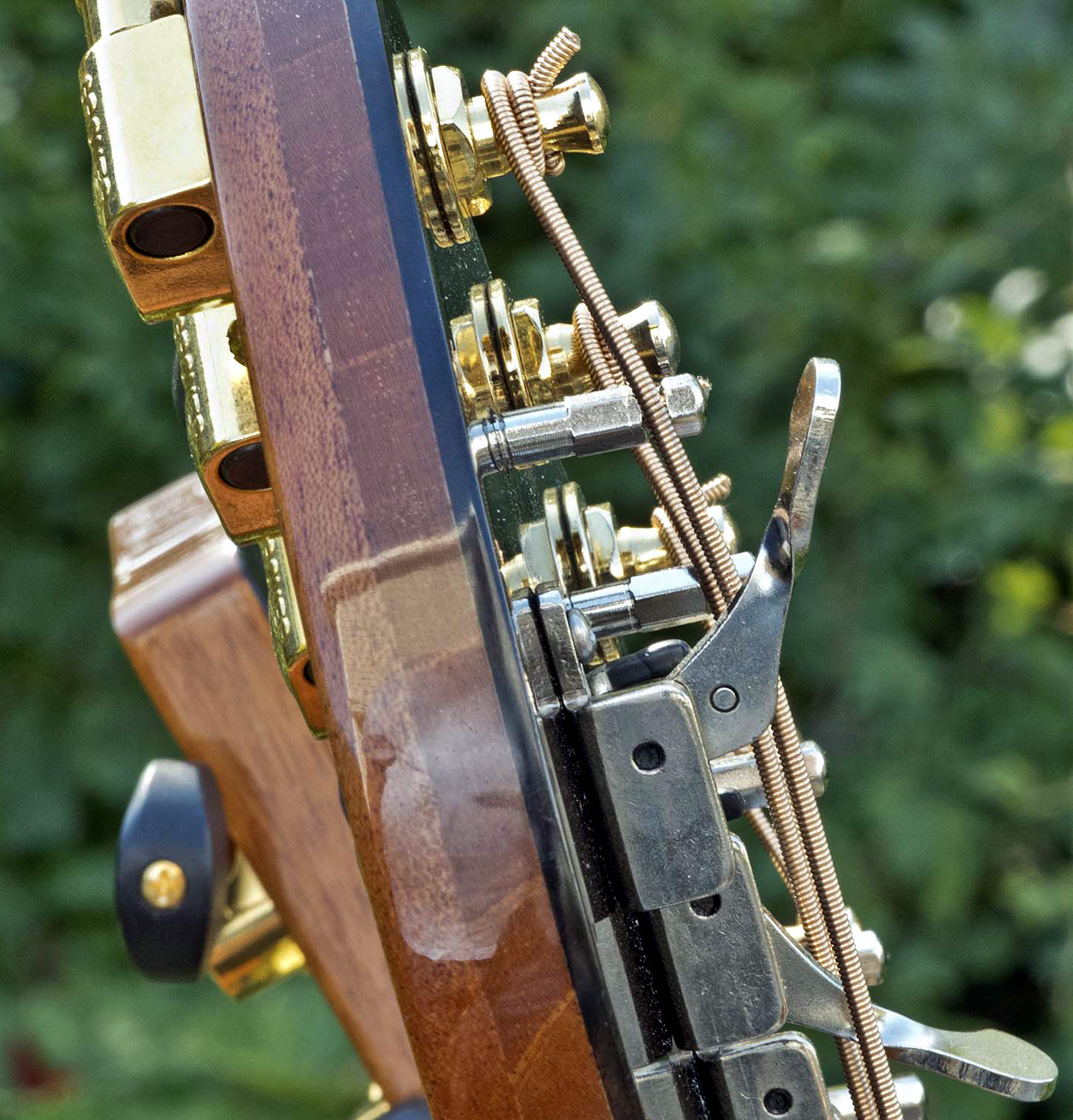
Detune and loosen the strings and lift them up and over the pins so that each string fits in the groove at the top of each nut pin then bring each string back up to tension. Use the 4 mm nut driver to adjust the height of the pins so that the bottom of each string is about 3/8” above the surface when the string is at tension. Check the string tuning (you may get sick of hearing that but it’s important to check and re-check the tuning at every stage from here on out). Put a new piece of painters tape across the head in front of the nut pins, then, starting at the 6th string, tilt the base of a lever body up to get the lever arm stop (it has a black tip to protect the lever arm) on the treble side of the string and position the lever body under the string (note that when the lever arm or handle is down the handle will point towards the bridge), then raise the lever arm to the sharping position (pointing towards the tuner posts) so that the groove in the lever actuator contacts the string. The long adjustment slot of the lever body will be directly under the string and the tab with the short slot will point towards the tuners.
Move the lever assembly back and forth under/along the string while checking your electronic tuner. When the tuner shows a half-step above the open string pitch, hold the lever assembly in position, lower the lever arm and re-check the open string tuning. Adjust if needed. If the string buzzes against the lever groove when the lever arm is down then raise the nut post (turn it counterclockwise) a bit. Check the string tuning at every stage. Keeping the lever body in position, raise the lever arm again and check the position and tuning. Keep refining the location until both the open and half-step sharp pitches are consistent and as close to tuned in both positions as you can. Mark the position of the centre of the long adjustment slot under the string. Repeat this procedure for all strings, marking the centre of the long adjustment slot on each. I repeat, check the string tuning, with and without the lever up, at every stage for each string!
Once the lever locations are marked, detune and loosen the 6th bass string and lift it off of the nut pin so you can see the marked location (for the screw that goes in the long adjustment slot) that was directly under the string. Use a nail to dimple the location for the first lever assembly screw and, using a 1/16” drill, drill a pilot hole 3/8” deep (mark the depth with some tape on the drill bit so you don’t go all the way through the head this time). Repeat this for the other five strings, then remove the painters tape.
Install the 6th string lever assembly with one of the provided 1/2” long Phillips head screws until it is just tight enough to hold the lever in position but will still let you move the assembly along the length of the string. Move the string back onto the nut pin groove and bring it back up to pitch. Raise the lever arm, check the sharped tuning and carefully adjust the assembly position until you’re happy with the half-step tuning (remember there’s no tape protecting the finish now so don’t screw the lever down too tight). Raise and lower the lever arm a few times, checking the tuning open and with the lever arm up, then tighten the screw in the long slot down. Finally, drill and install the 2nd screw in the short slot to fix the lever body in position. Make sure the lever body is parallel to the string. Repeat this procedure for the other five strings. Finally, put all of the strings back over the nut pins and bring them back up to tension.
The final step is to use the 4 mm nut driver to regulate (adjust) the pitch of the strings with the lever arms up. It’s best to use an accurate chromatic tuner – a tuner that reports cents deviation from pitch is excellent – but any decent electronic tuner should do the job. Check and adjust the tuning of the open string, put the lever arm up and check the tuning. If the “sharped” note (with the lever up) measures flat then adjust the nut pin down, that is, tighten it or turn the nut driver clockwise to lower the string. Lowering the pin makes the lever lift the string up higher and sharpens the note. If the note when the lever arm is up is sharp then adjust the nut pin up, that is, loosen it or turn the nut driver counterclockwise, to flatten the note. Raising the pin raises the string and reduces how much the lever pushes the string up thus lowering the pitch. Repeat until all of the levers have been regulated, checking the tuning open and sharped repeatedly.
One last note. On the off chance that a string still buzzes when the lever arm is down, you may need to add a stop, or hold-down, screw – for Rees levers these are short screws with an L-shaped hook at the end – that will limit the string movement and hold it firmly against both the nut pin and the lever grooves. I ordered them but have not had to use them. If you find that you need them, they’re less than 40c each and there are instructions for installing them on the Rees Harp website. Another tip, from the folks at Rees Harps, is to add a bit of wax on the half-inch or so of string where the lever engages it for smoother movement and to minimize noise when the lever arm is raised to contact the string.
That’s it…you’re done!
Now go play something…
Phil Schappert
philjs@eastlink.ca
philschappert.ca


Nicely detailed instructions and tips. Thank you.
It would have been useful when I installed my Cammac levers on The Timberline 20 HGC
Note that the Cammac levers are not made like the Rees Harps levers ,
The groove in the lever actuator (where the string rests when activated )
is built much differently so that when the lever arm or handle is down the handle will NOT point towards the bridge but toward the machine heads .
Thanks again for that useful PDF
Jocelyn Boily
A most detailed and informative piece. Many thanks. DADGAD and myself go back 38 years to Davy Graham’s front room.